Software Guide
How to set up the station and record data with the DexUMI data-collection GUI.
Environment set up
Use an Ubuntu 24.04 x86_64 station with a local desktop session, Python 3.12, and uv installed. Run the GUI server from a terminal in that desktop session: the recorder opens its preview window on the station, even if you open the GUI in another browser. Connect two assembled DexUMI gloves, each with an iPhone and an OAK wrist camera. The head OAK camera is optional.
The DexUMI data-collection software shares one Python environment with the UMI software. Run Python commands as your normal user; use sudo only for the system setup below.
1. Install system packages and download assets
sudo apt update
sudo apt install -y git git-lfs curl ffmpeg libgl1 libglib2.0-0 usbmuxd libimobiledevice-utils
FFmpeg provides the ffmpeg video encoder and ffplay playback tool. usbmuxd provides the USB connection to the iPhones; the libimobiledevice utilities help check pairing.
From your checkout, download the Git LFS assets:
cd <repository>
git lfs install
git lfs pull
2. Configure USB and serial access
Give your account access to the gloves' serial ports and the OAK cameras:
sudo usermod -aG dialout "$USER"
echo 'SUBSYSTEM=="usb", ATTRS{idVendor}=="03e7", MODE="0660", GROUP="dialout"' | sudo tee /etc/udev/rules.d/80-movidius.rules
sudo udevadm control --reload-rules
sudo udevadm trigger
Log out and back in after adding yourself to dialout. Opening a new terminal is not enough. Replug the gloves and OAK cameras, then run id -nG and confirm it lists dialout. Glove serial ports normally appear as /dev/ttyACM*; the software identifies each glove by its board serial, so do not hard-code a port number.
Unlock each connected iPhone and accept Trust This Computer if prompted. Run idevice_id -l to check that the station can see each phone. If pairing fails, keep that phone unlocked and run idevicepair -u <phone-udid> pair, then accept any prompt on the phone. Follow Phone set up to enable Record3D USB streaming before refreshing devices in the GUI.
3. Install the Python dependencies
Install from the repository root:
cd <repository>
uv syncuv sync at the repository root, not inside the DexUMI folder: there it would remove the packages that only the UMI software needs.4. Launch the DexUMI GUI
uv run dexumi_dc # starts the data-collection GUI and opens it in your browserThe GUI is served at http://127.0.0.1:8791/. dexumi_dc --no-open skips opening the browser, and dexumi_dc --help lists the other options. From UMIverse_software/dexumi/data_collection_scripts, ./launch.sh gui starts the same GUI.
To type dexumi_dc in any terminal without uv run, link it into ~/.local/bin once, from the repository root:
mkdir -p ~/.local/bin && ln -sf "$PWD/.venv/bin/dexumi_dc" ~/.local/bin/Phone set up
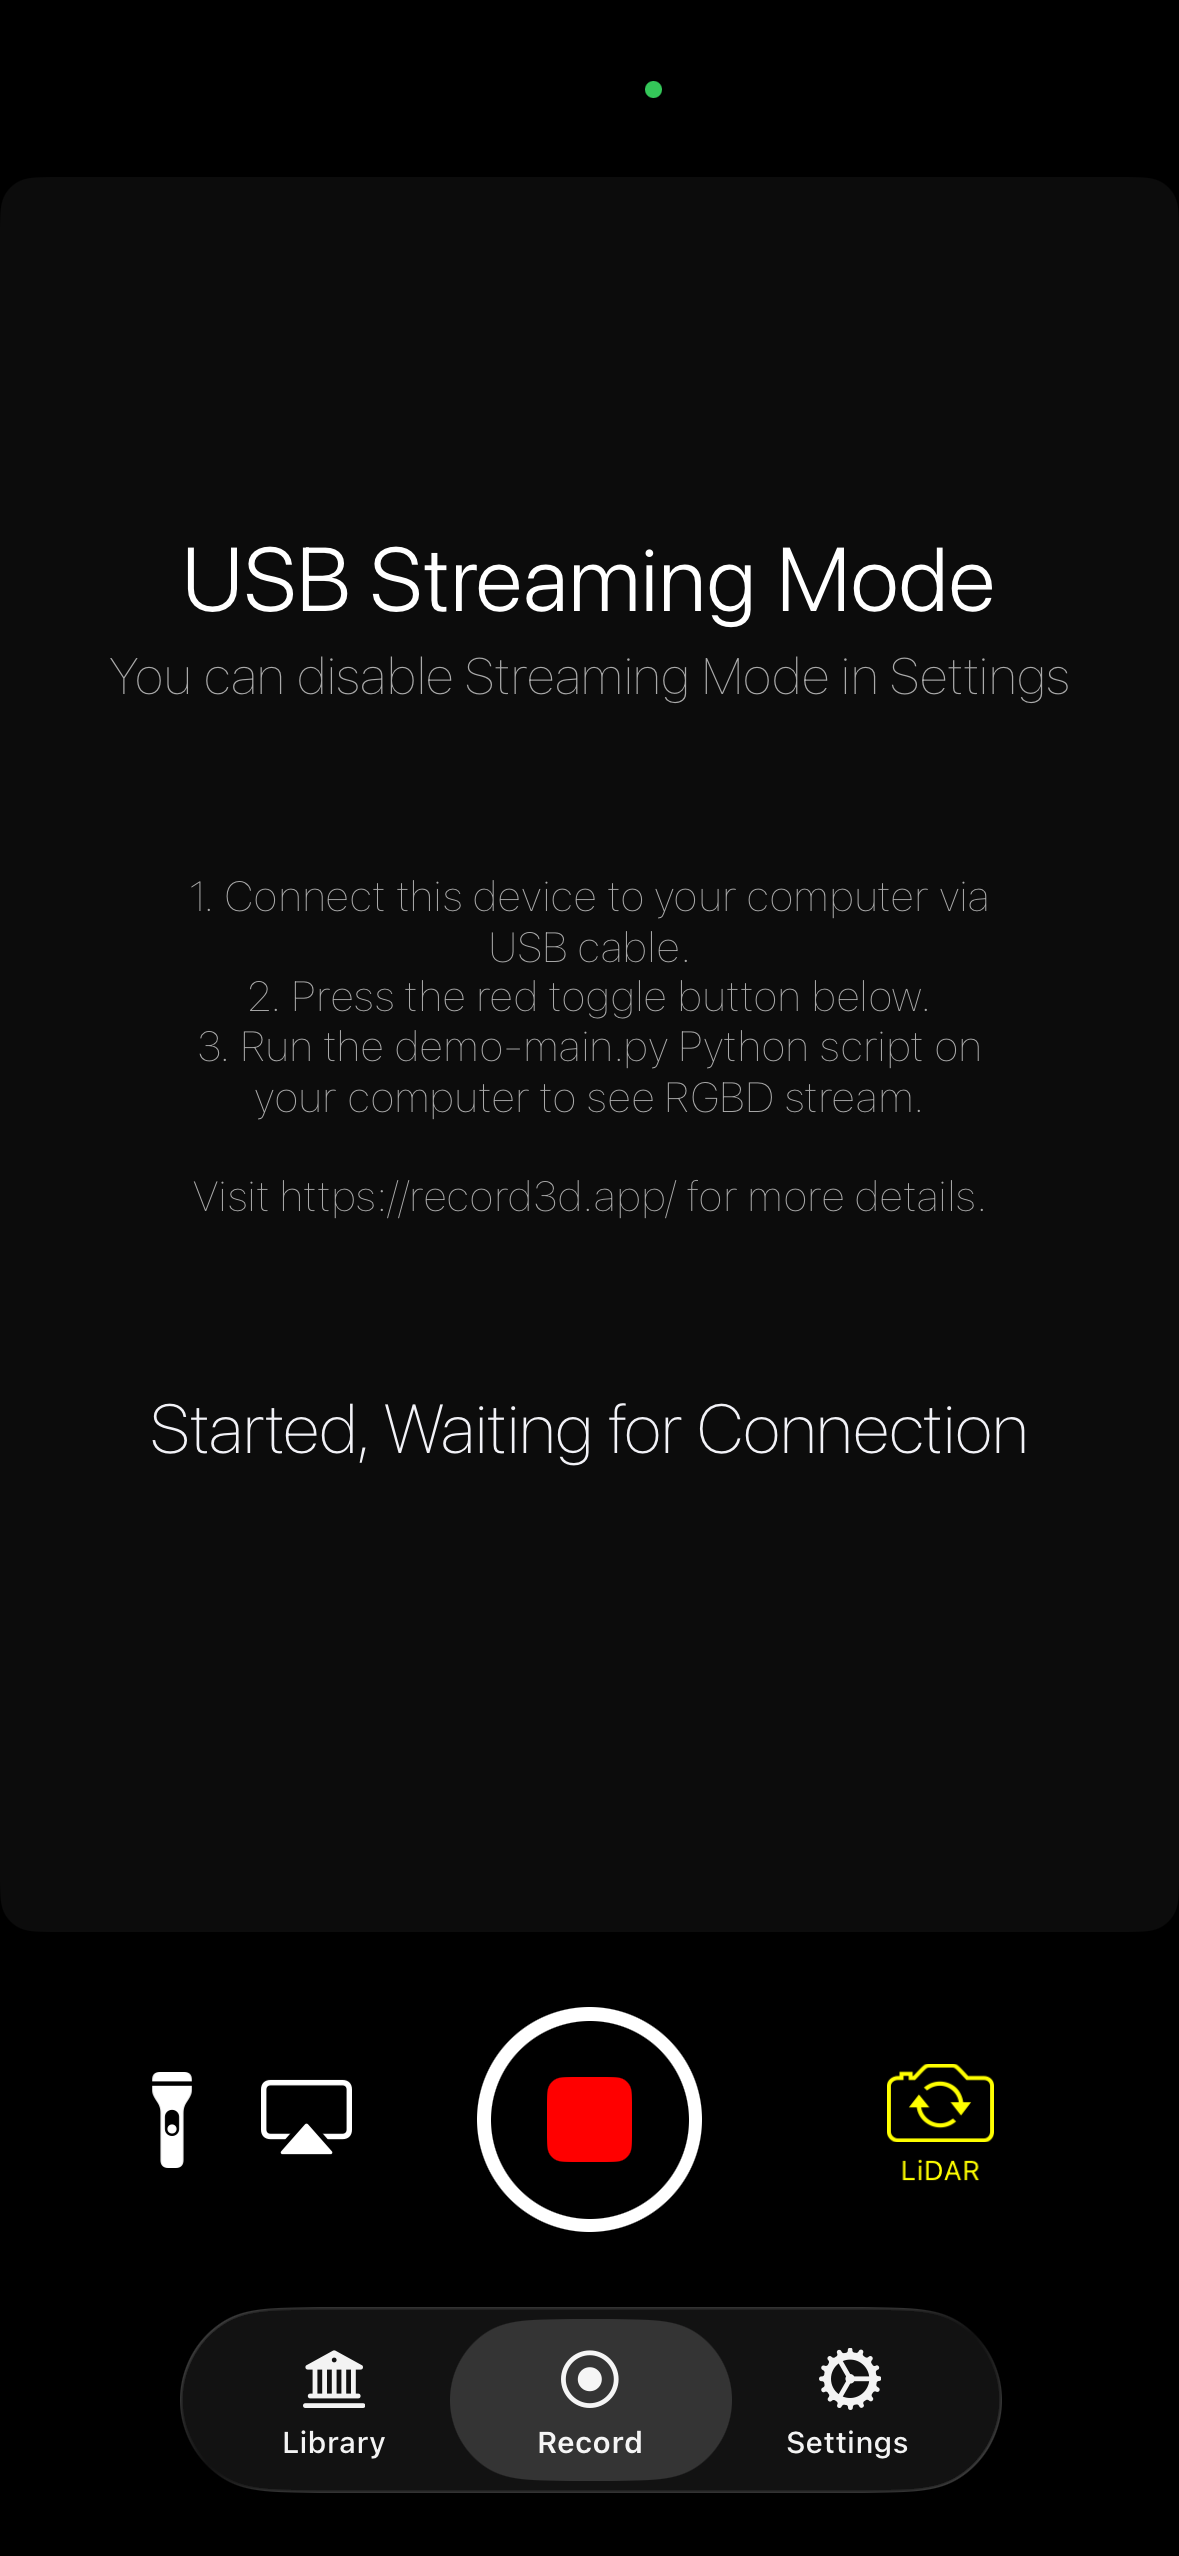
Each hand's iPhone streams its camera to the station through Record3D over USB. Complete these steps on every phone.
1. Install Record3D
Download Record3D from the App Store and open it.
2. Enable Guided Access
- With Record3D open, triple-click the side button to enter Guided Access.
- Enter the Guided Access passcode if prompted (the same passcode you use to unlock the phone).
- Keep Record3D in the foreground while collecting data.
3. Configure Record3D
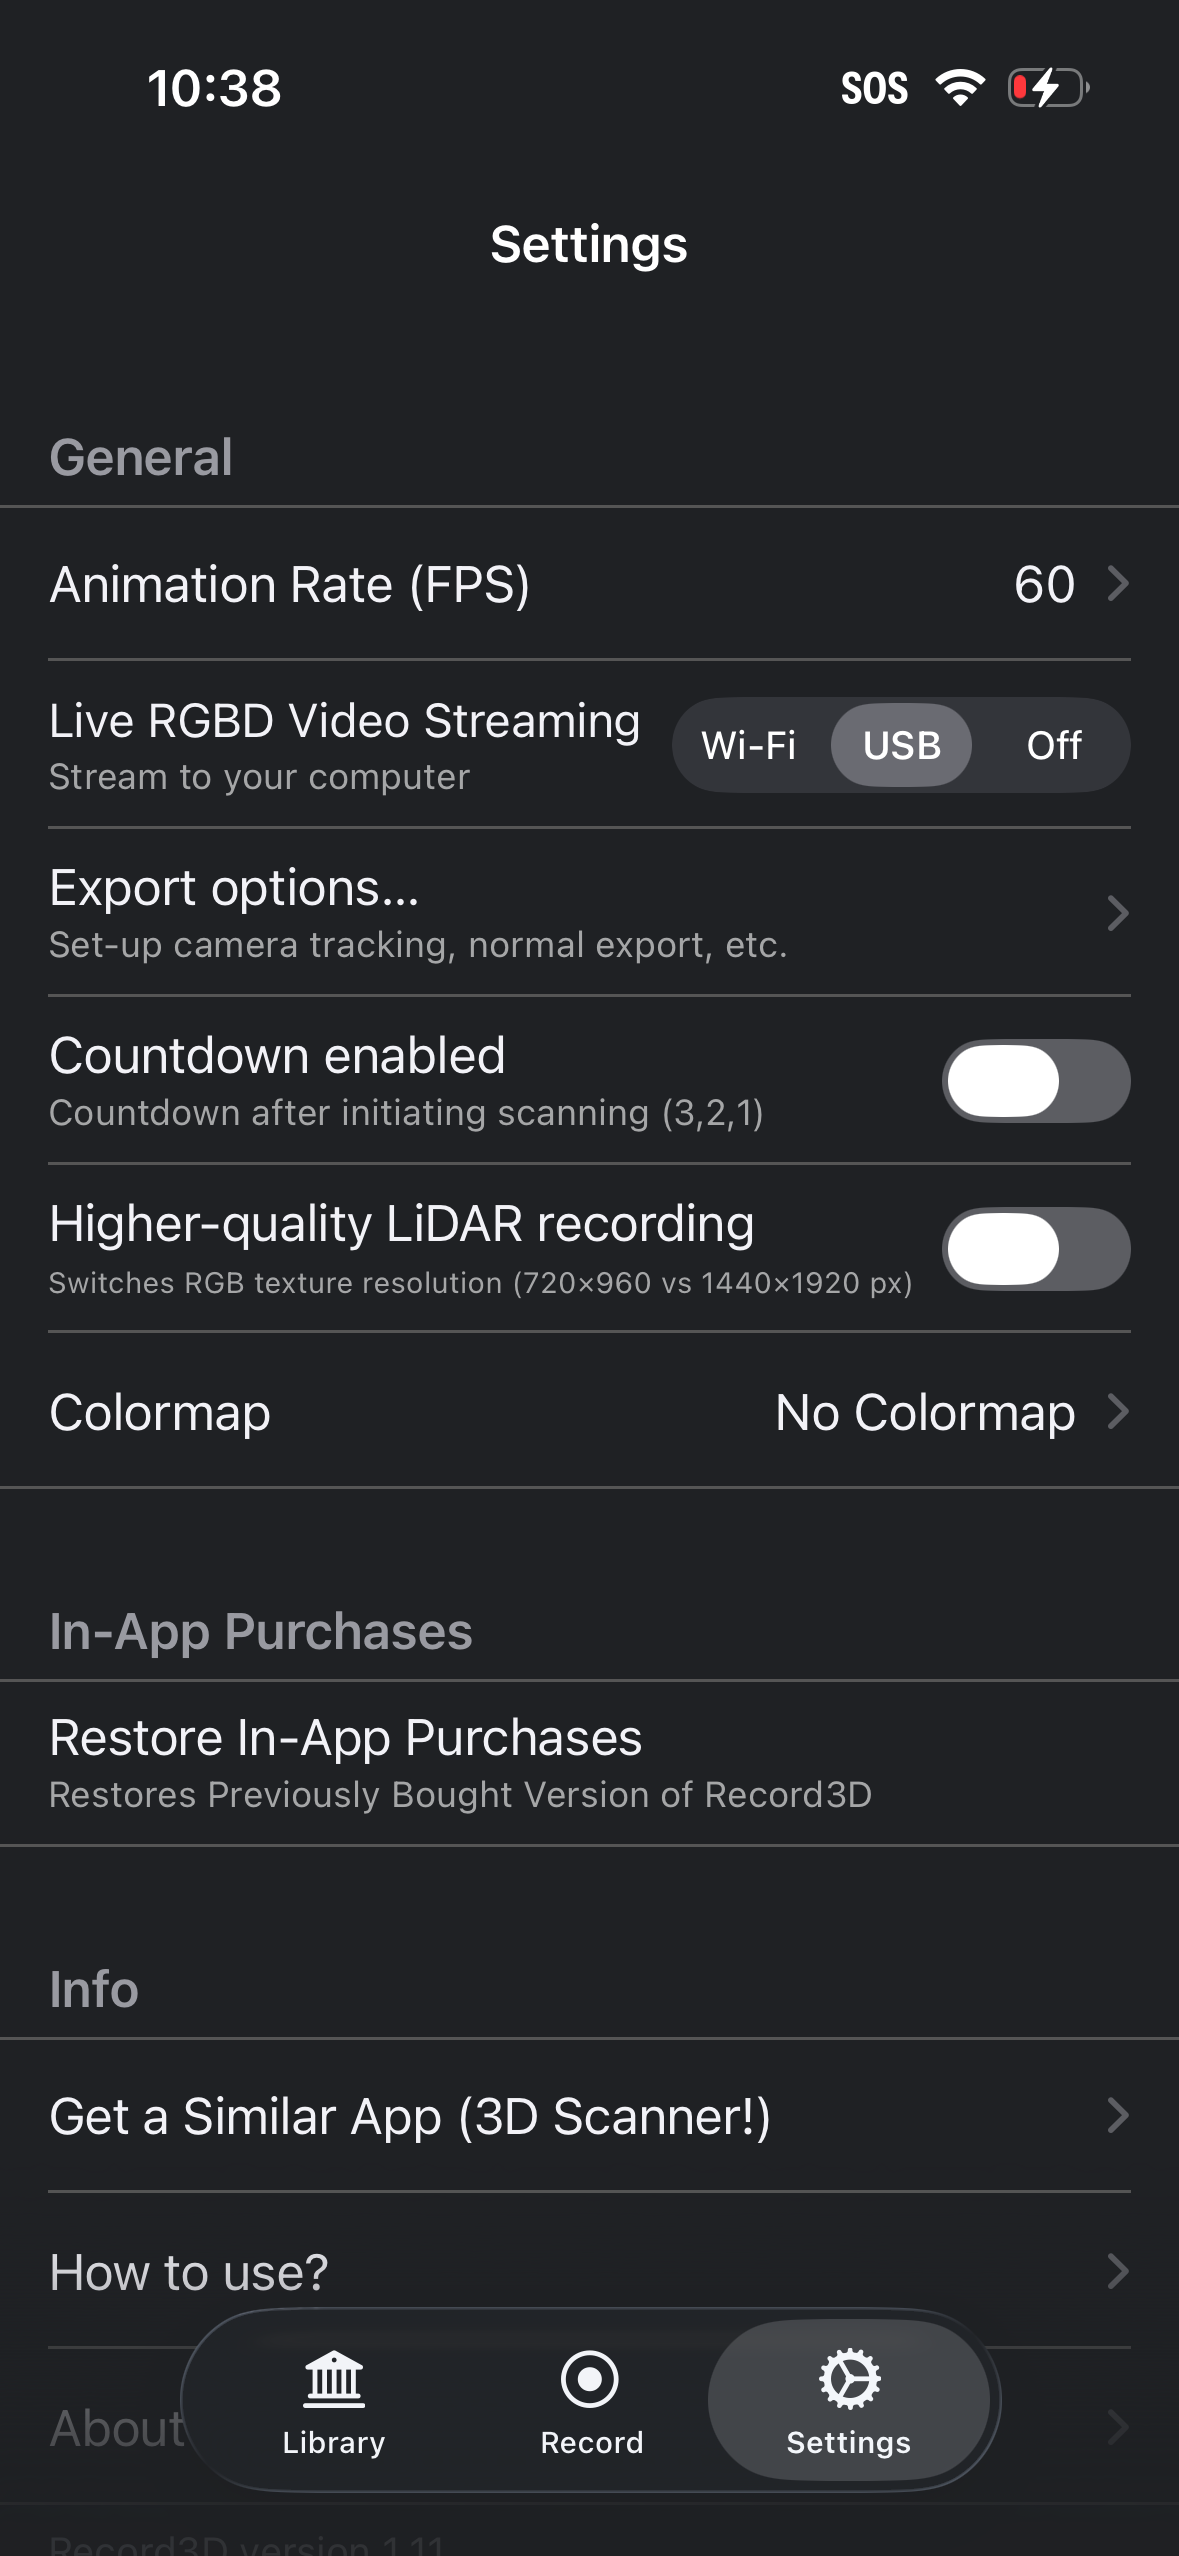
- Open the Record3D settings and set Live RGBD Video Streaming to USB.
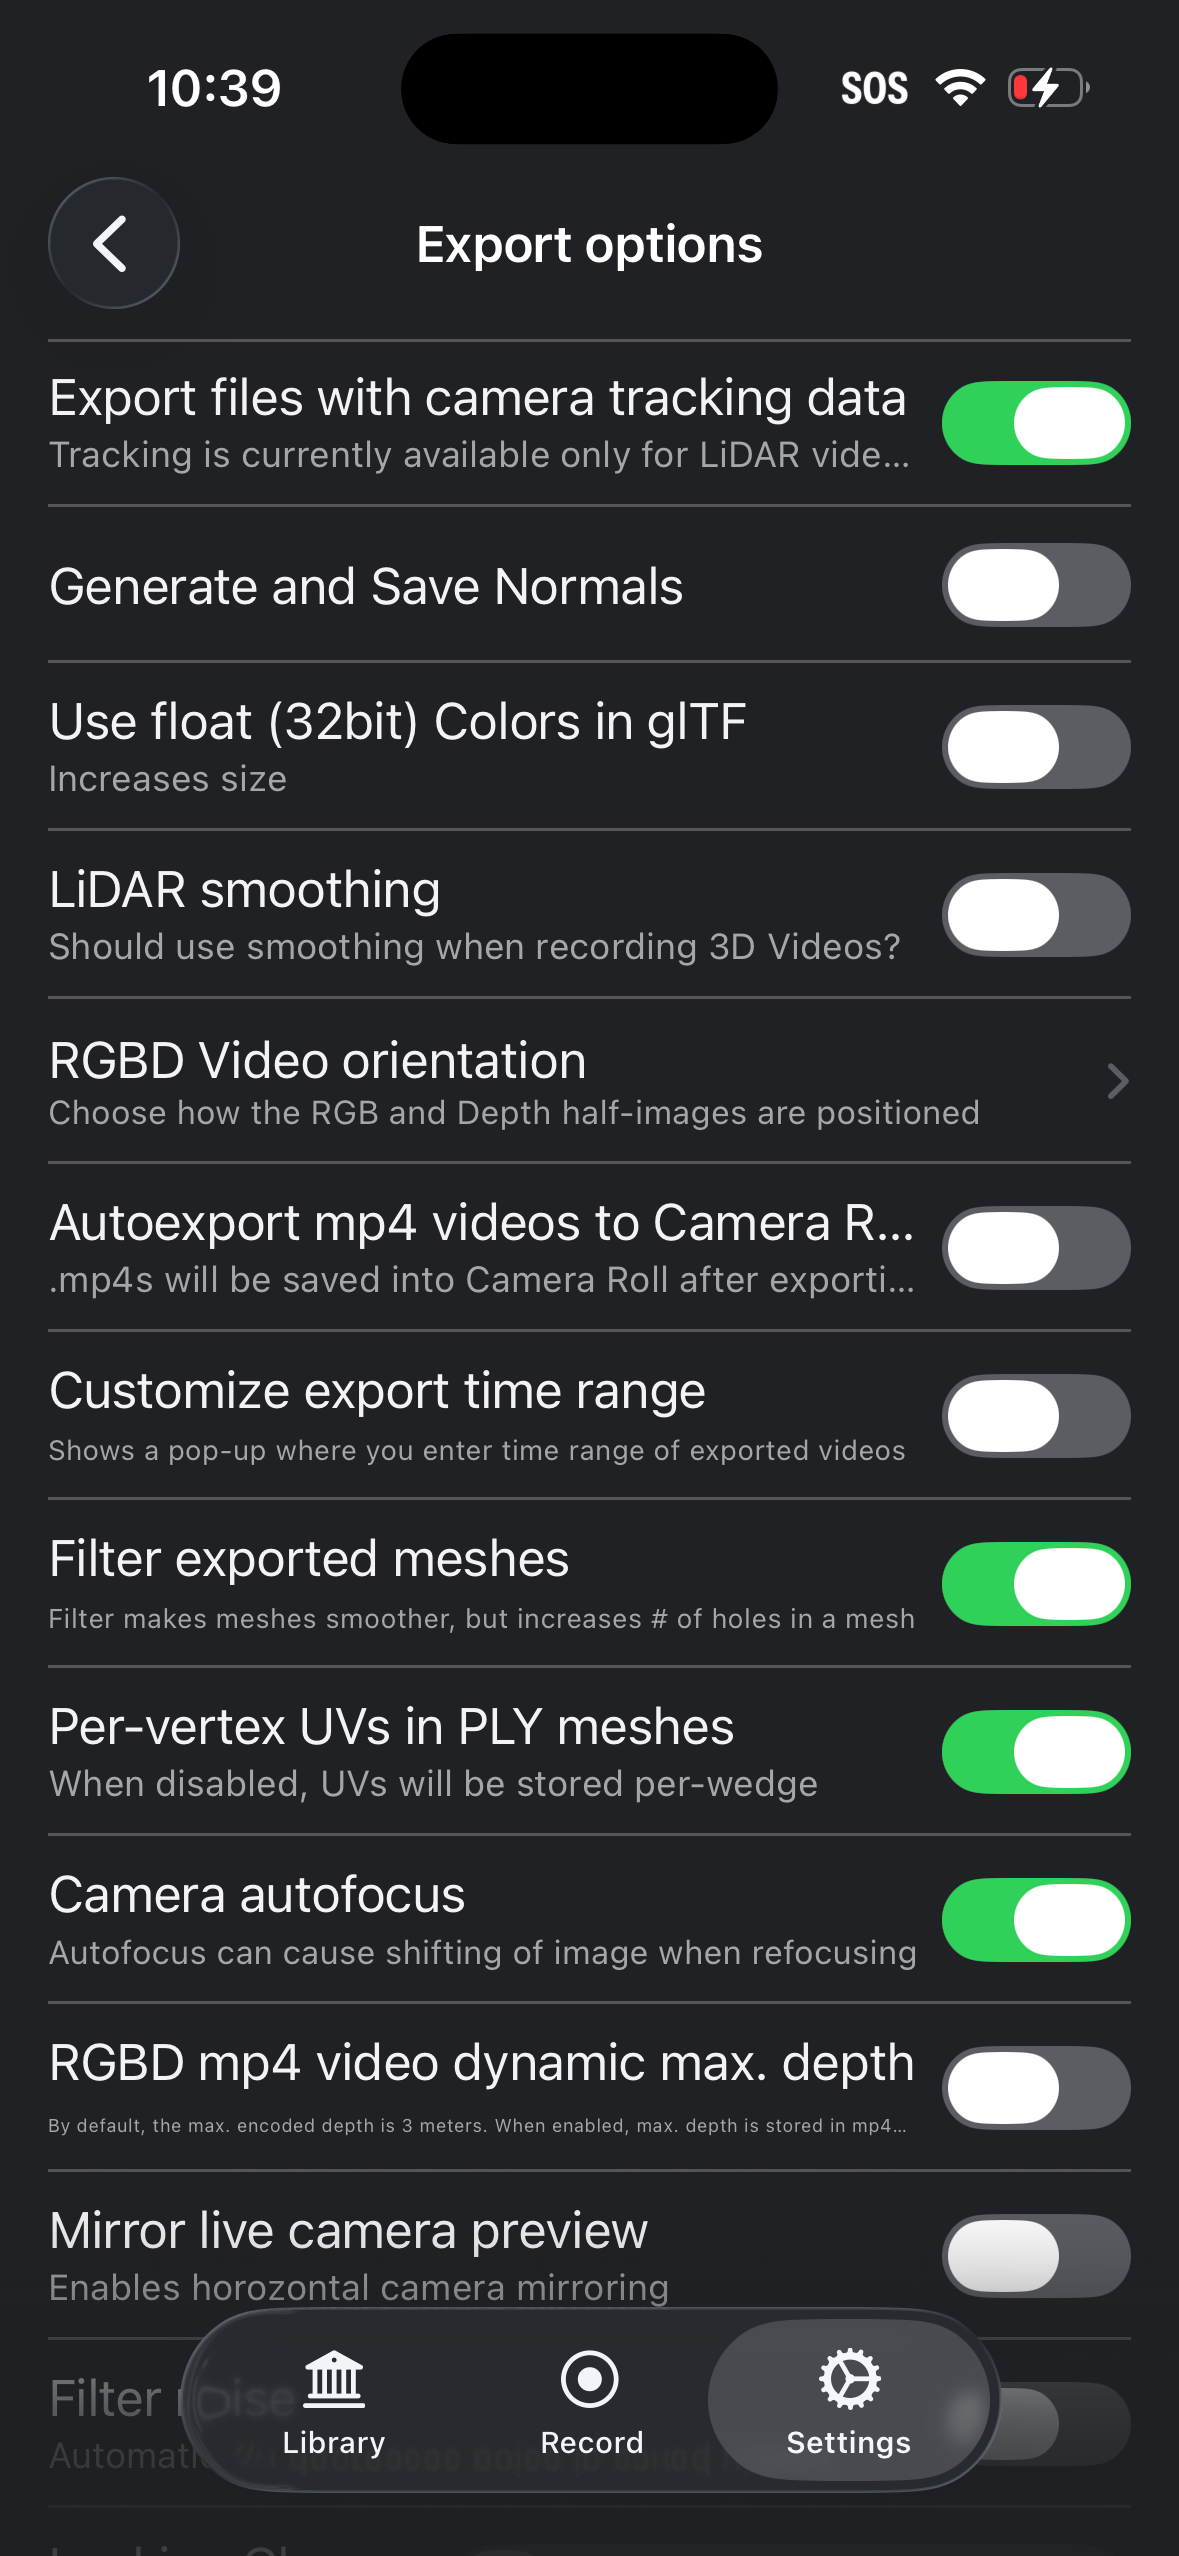
- Open Export options and enable Export files with camera tracking data, Filter exported meshes, Per-vertex UVs in PLY meshes and Camera autofocus.
4. Start streaming and connect
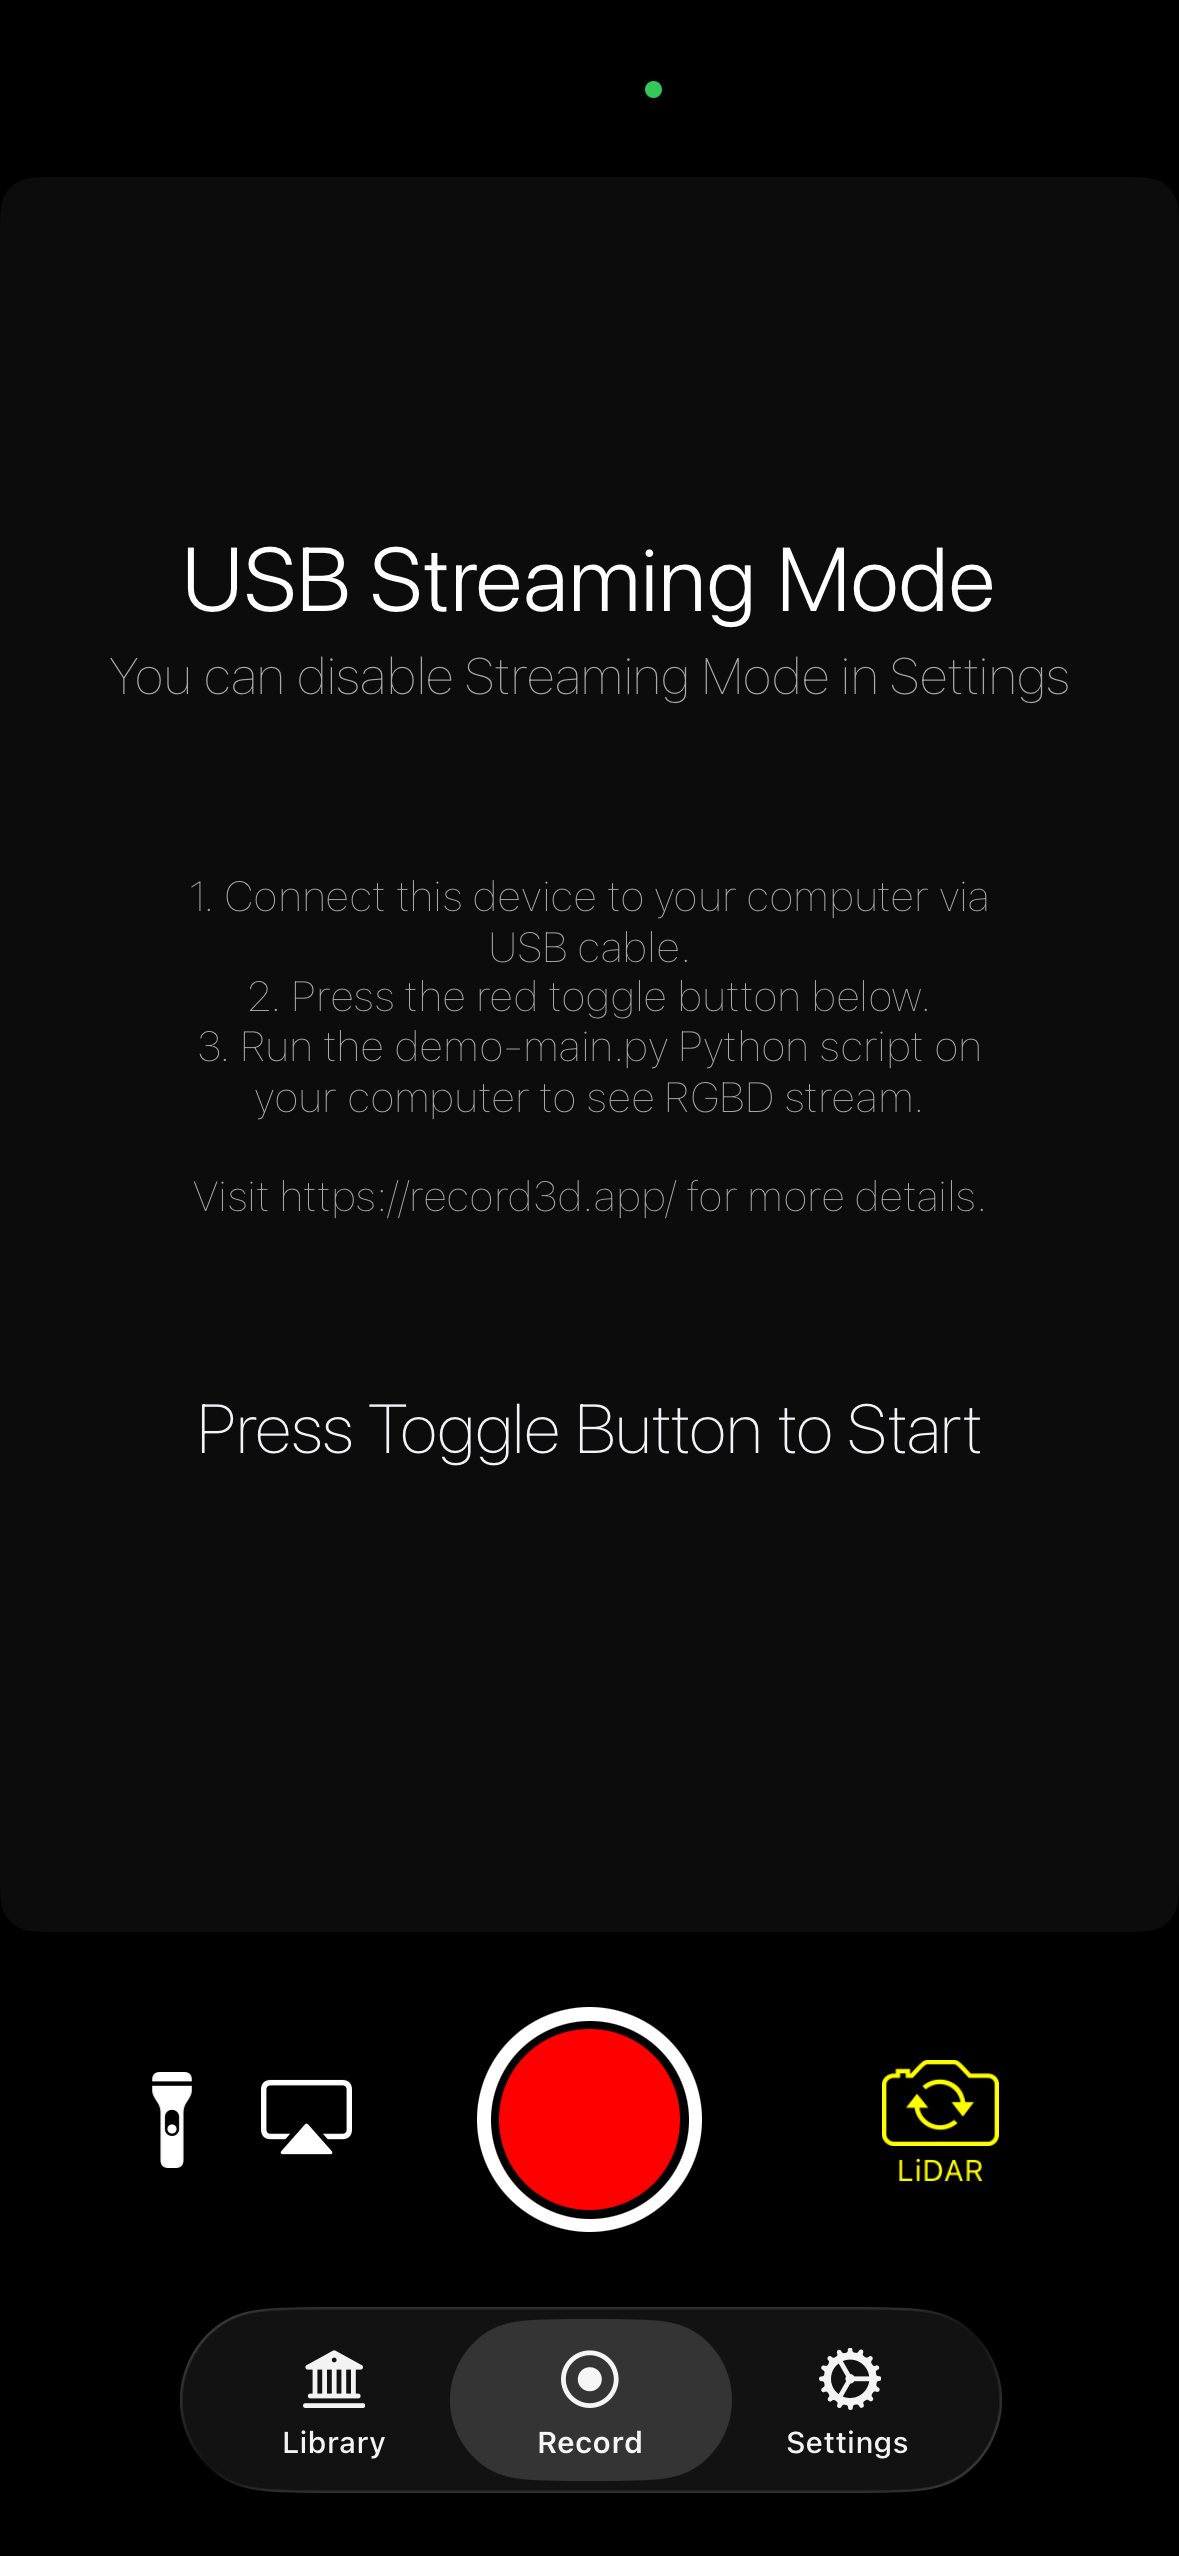
- Select Record in Record3D's bottom menu and press the red circular control to start streaming.
- Mount the phone on its exo glove and connect it to the station with a USB-C cable.
Data collection
Open the GUI (see Environment set up) and work through its steps in order: Steps 01 to 04 record a session, and Step 05 converts finished sessions for training.
Calibrate
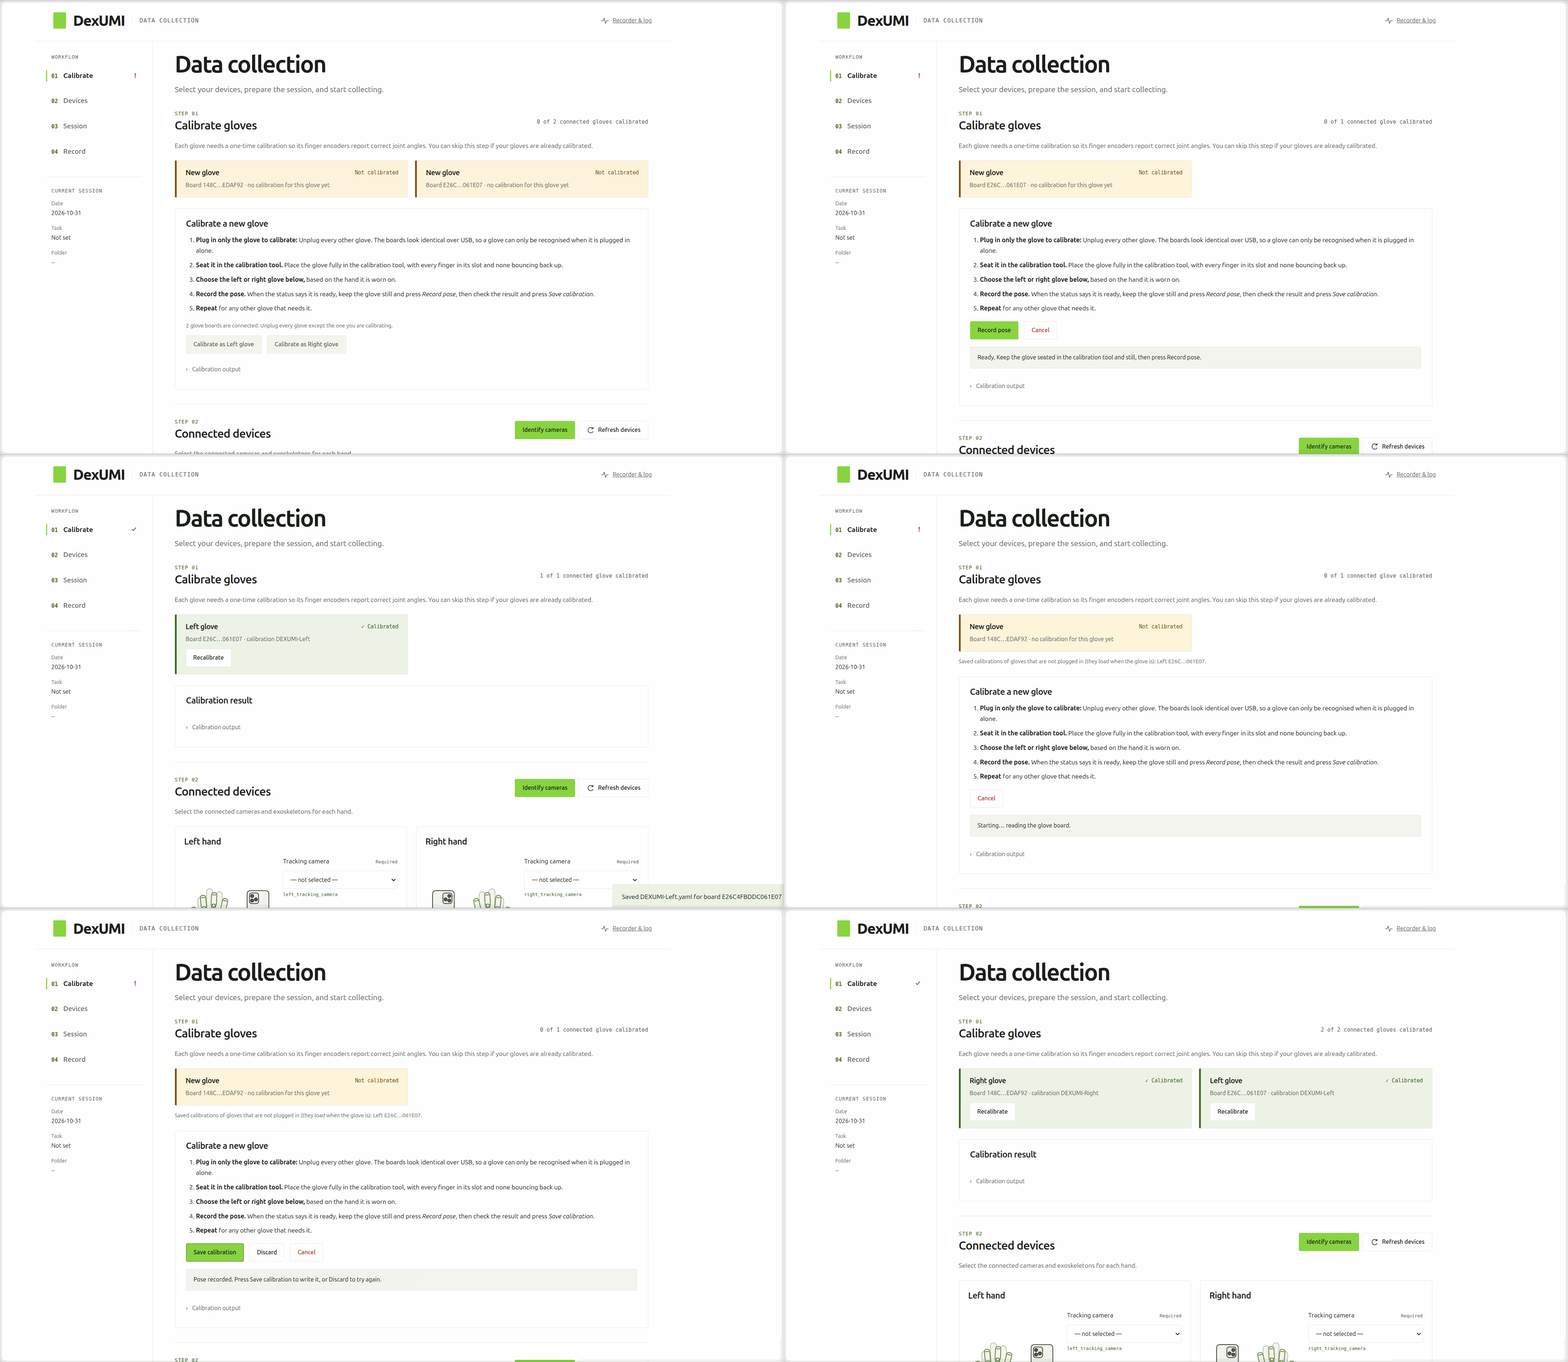
Step 01, Calibrate gloves. Each glove needs a one-time calibration so its finger encoders report correct joint angles. Skip this step if your gloves are already calibrated.
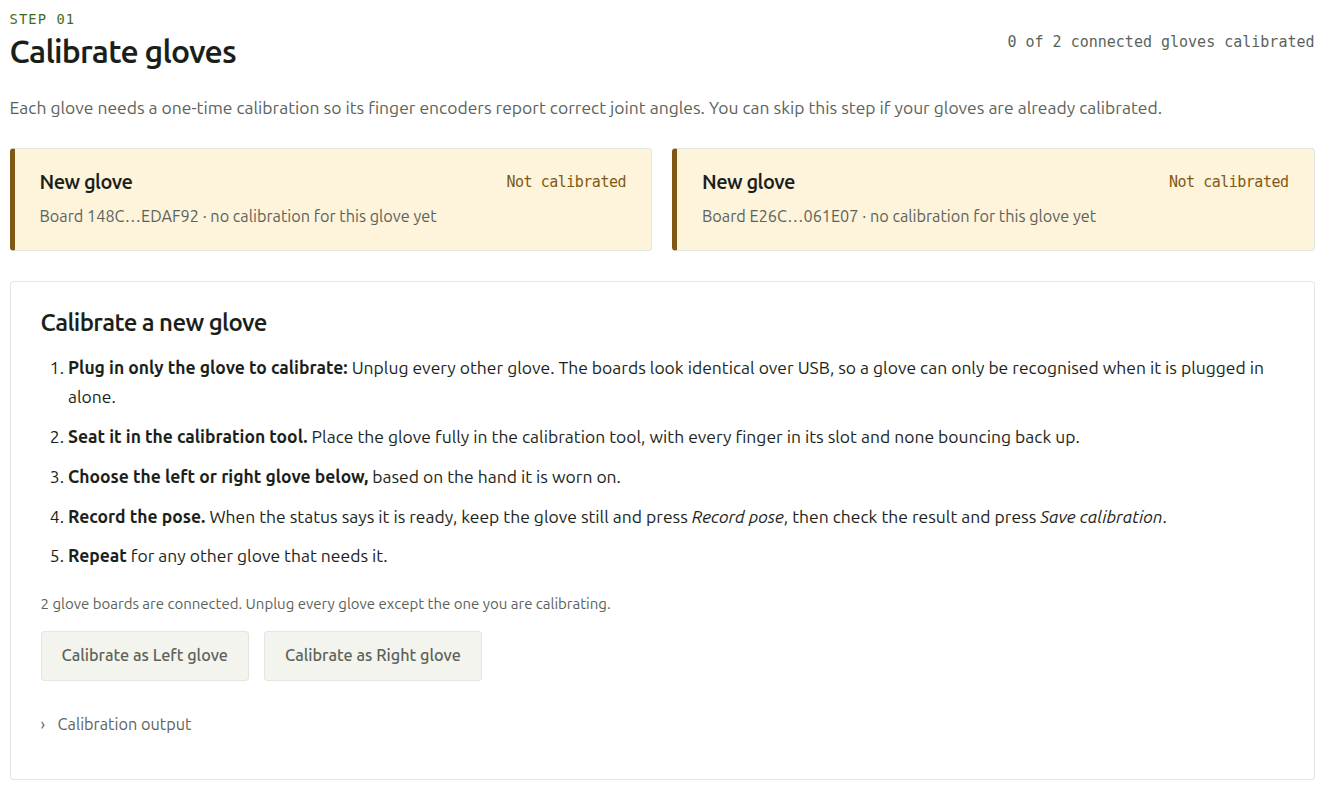
- Plug in only the glove to calibrate. The boards look identical over USB, so a glove is only recognised when it is plugged in alone.
- Seat it in the v4 calibration tool, with every finger in its slot and none bouncing back up.
- Choose Left or Right, based on the hand it is worn on.
- Keep the glove still, press Record pose, check the result, then press Save calibration.
- Repeat for any other glove that needs it.
Where the calibration is saved
The result is saved as config/dexumi_exoskeleton/DEXUMI-Left.yaml or DEXUMI-Right.yaml. Each glove's calibration is also kept in config/dexumi_exoskeleton/library/ under its board serial and is loaded again automatically whenever that glove is plugged in. These files are specific to each station and are not tracked by git. A glove's first calibration starts from its design template in config/dexumi_exoskeleton/templates/.
Recalibrating
Press Recalibrate on the glove's card. The old calibration is kept as a .bak and restored if you cancel.
Plugging in the gloves
The first calibration of each glove needs it plugged in alone. Once a glove is calibrated, its config stores the board's serial number, so later runs open that board directly and both gloves can stay plugged in. Recalibrating a glove that is already calibrated does not need the other glove unplugged. The cameras of both gloves can stay plugged in throughout.
Calibrating from the command line
To calibrate without the GUI (also the way to calibrate a glove that is built differently), run the calibrate script for each glove with --manual:
cd <repository>/UMIverse_software/dexumi/data_collection_scripts
./launch.sh calibrate --device DEXUMI-Right --manual
Use --device DEXUMI-Left for the left glove.
Device assignment
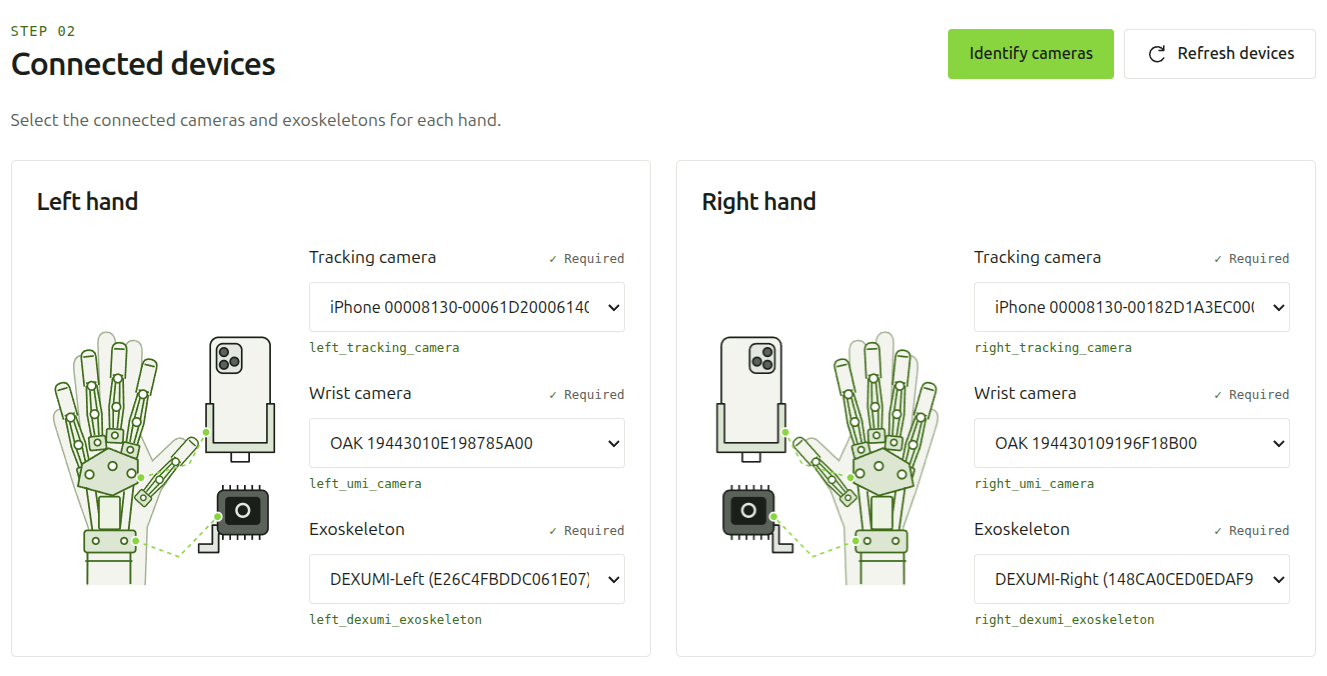
Step 02. Select the connected cameras for each hand. Each hand's exoskeleton is filled in automatically with the glove calibrated for that hand in Step 01.
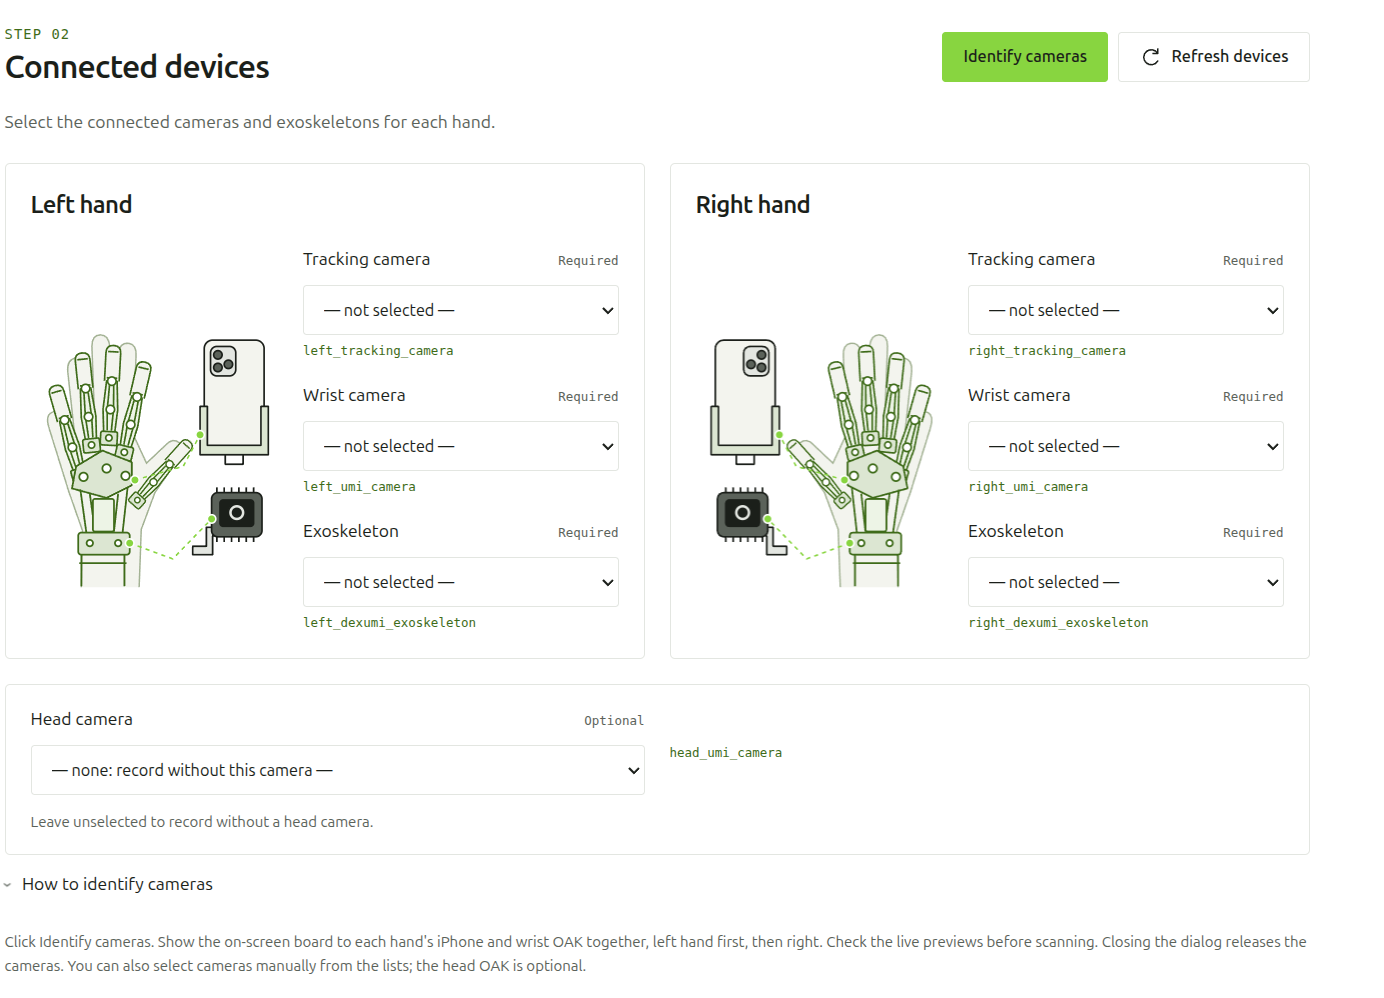
- Press Refresh devices to list what is connected.
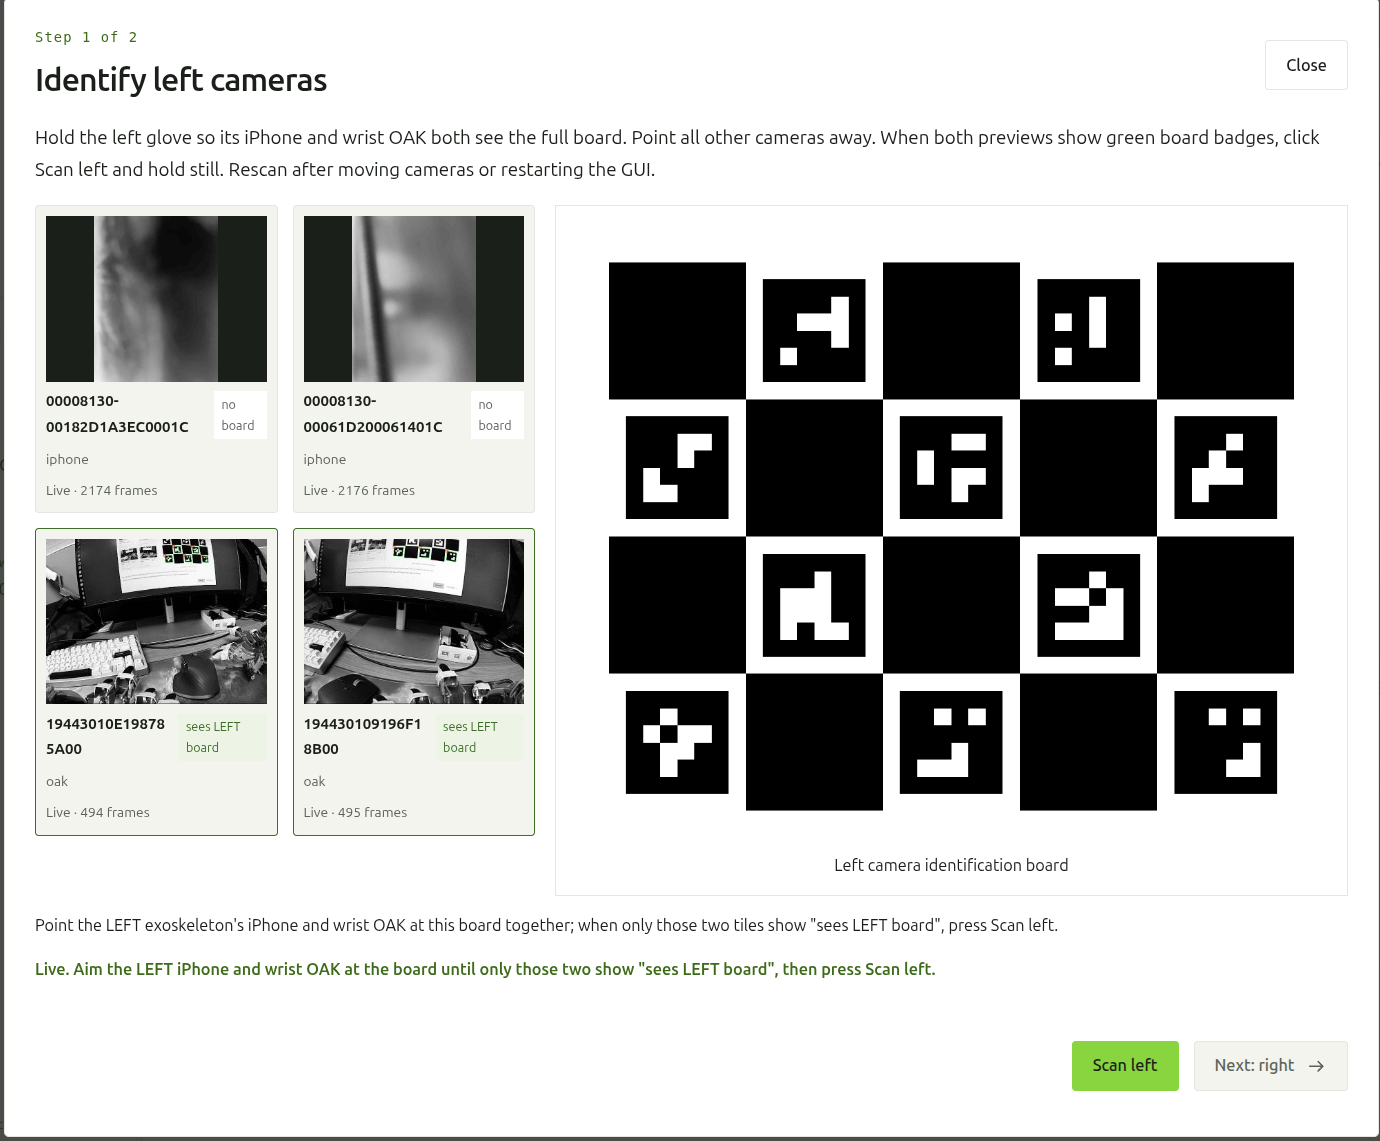
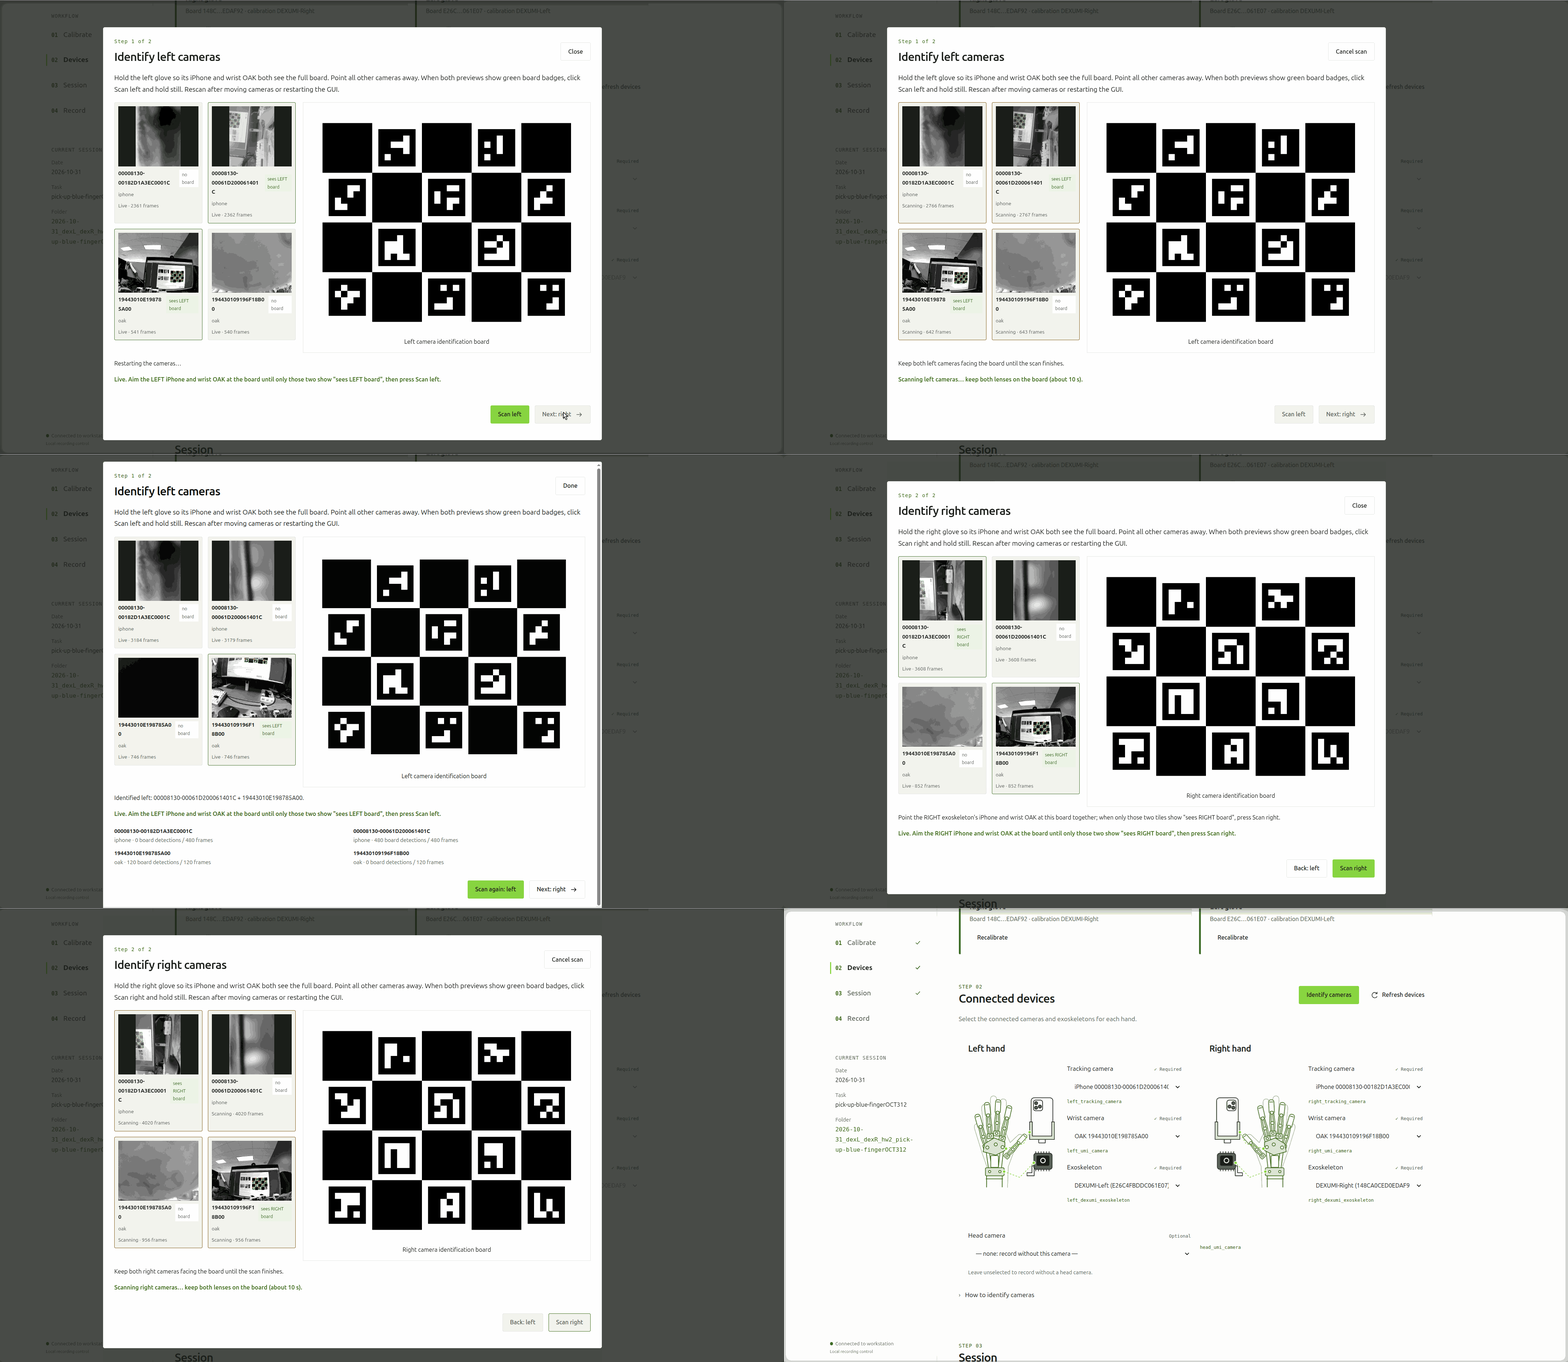
- Press Identify cameras. Show the on-screen board to each hand's iPhone and wrist OAK together, left hand first, then right. Check the live previews before scanning.
- Alternatively, select the cameras manually from the lists. The head OAK is optional.
Closing the identify dialog releases the cameras.
Identify cameras window
If a camera is not found
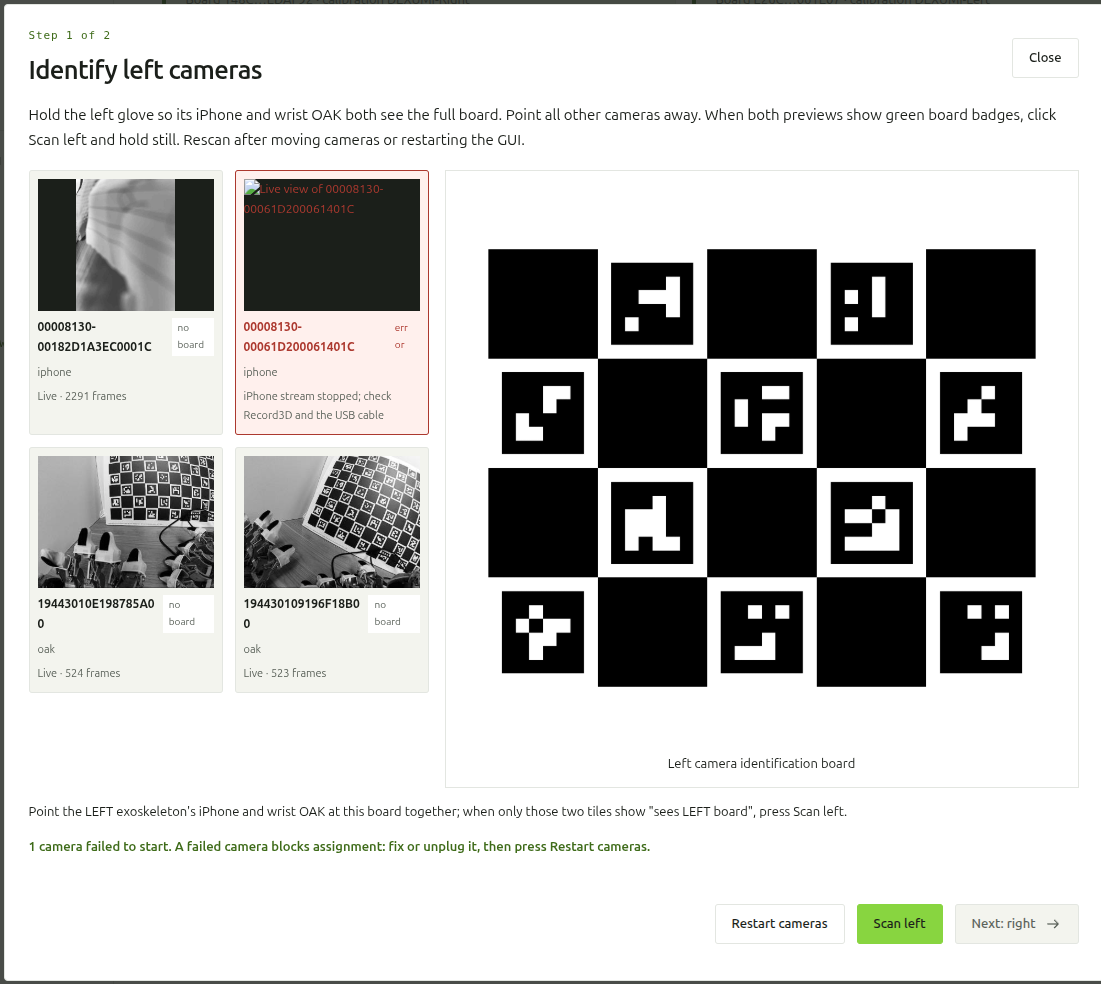
When a camera is not detected, its card shows a message. Replug that camera into the computer. When you unplug a phone, also restart the Record3D app, then press Restart cameras in the identify window.
All devices assigned
Session details
Step 03. Enter the session details.
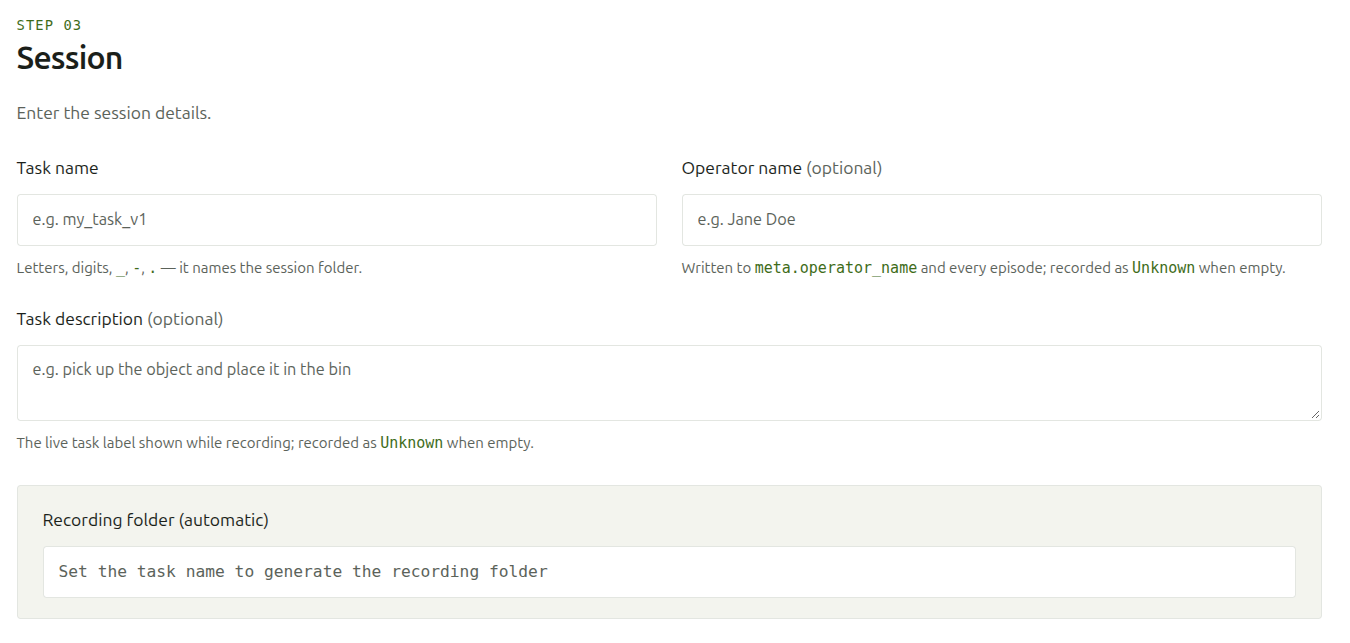
- Task name: letters, digits,
_,-and.. It names the session folder, and the recording folder is generated from it. - Operator name (optional): written to every episode; recorded as
Unknownwhen empty. - Task description (optional): the live task label shown while recording.
Record data
Step 04. Press Start recorder. It checks the camera streams, then opens a preview window on the station's desktop. Focus that window and use these keys:
| Key | Action |
|---|---|
s | Start recording |
w | Save the episode |
a | Discard the episode |
t | Set the task |
q | Quit |
w to save it, then press q.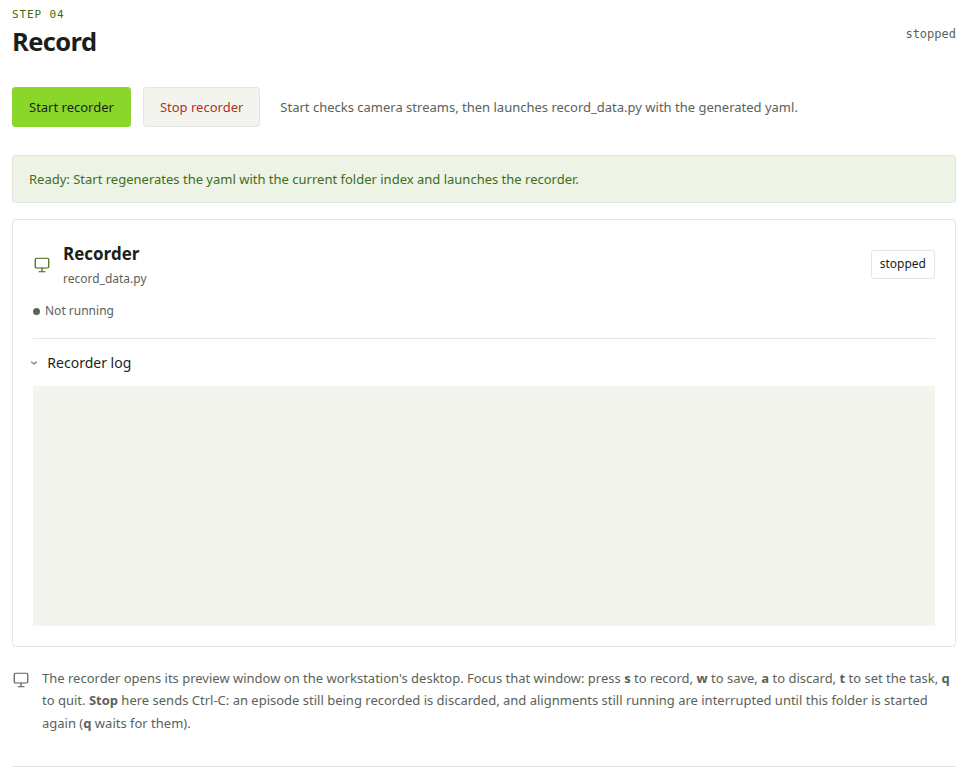
Recording window
Pressing Start recorder opens the live collection window on the station's desktop. It shows what is being captured from both hands, so you can confirm the cameras, gloves and tactile sensors work before you record. Click it to give it focus, since the keys only work in that window.
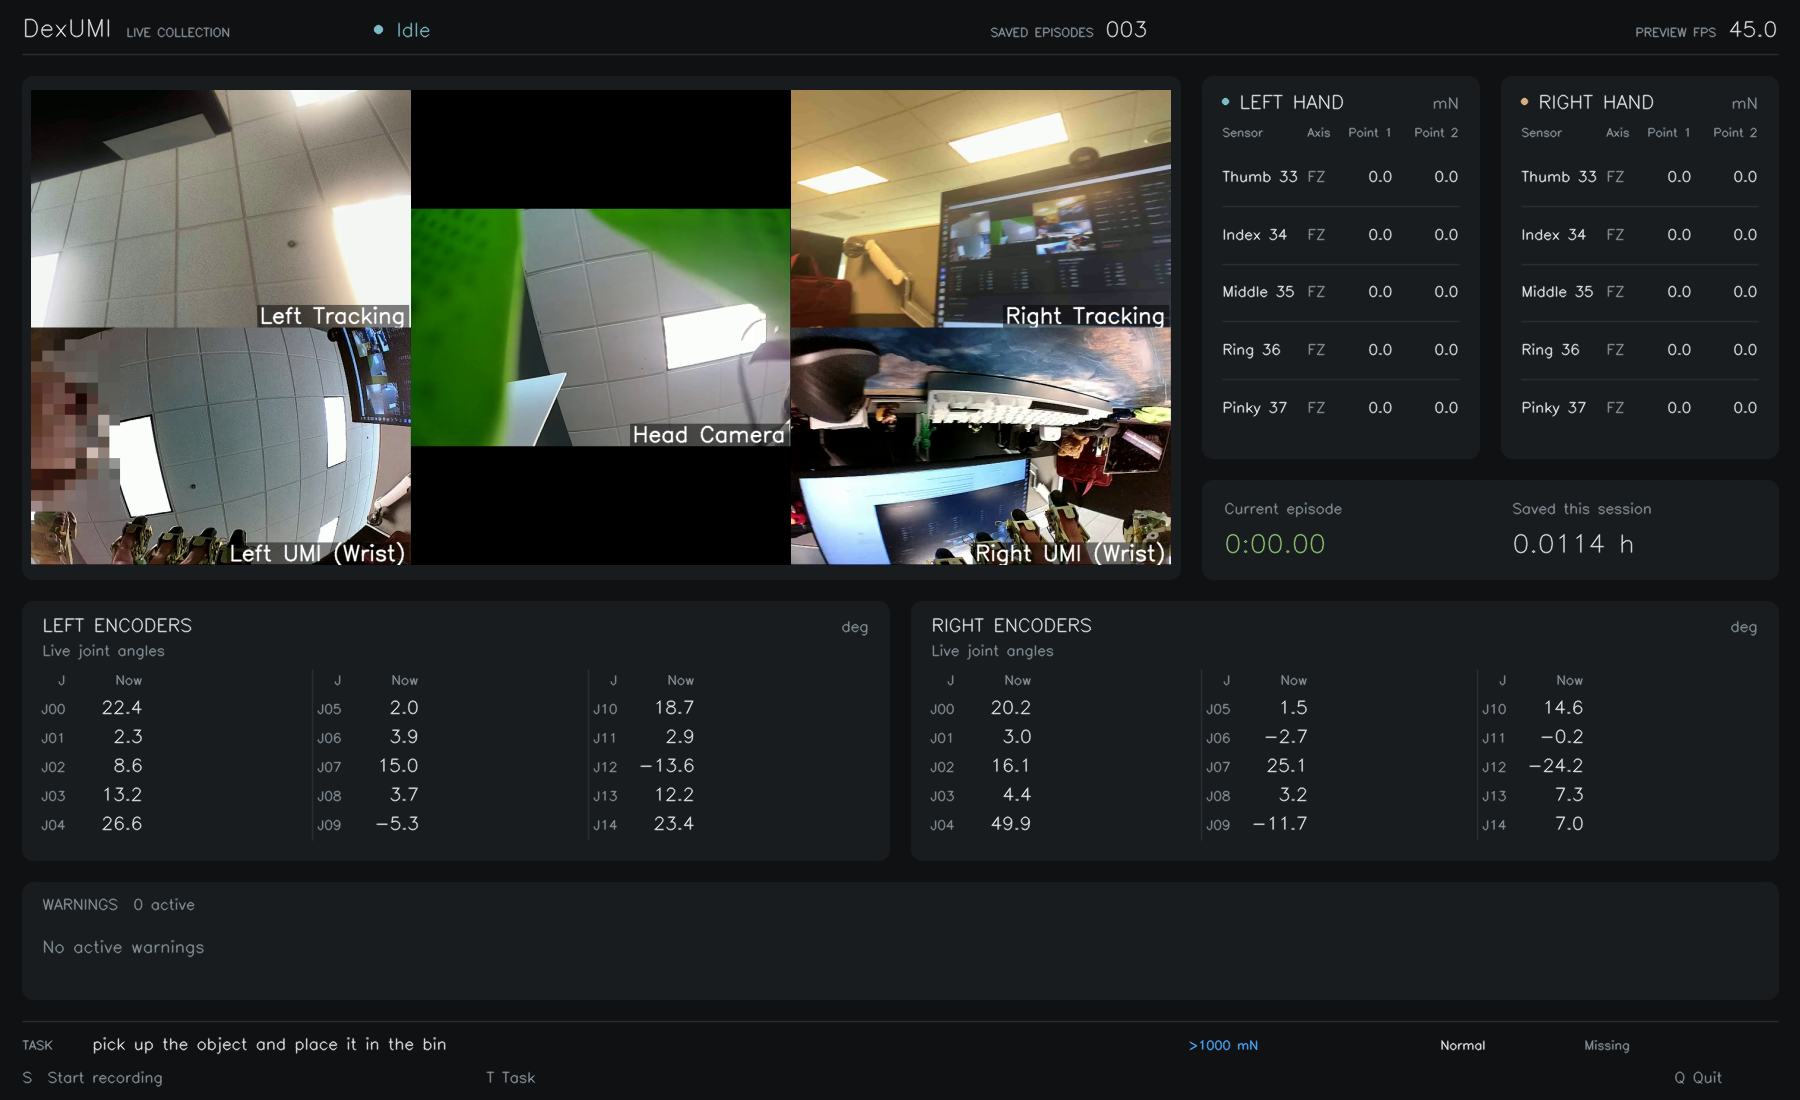
What the window shows
- Top bar: the recorder status (Idle until you start), the number of saved episodes, and the preview frame rate.
- Camera tiles: each hand's tracking camera and wrist camera, labelled left and right. Make sure every view is live and the hands can see the workspace.
- Left / Right hand panels: the fingertip tactile sensors (thumb to pinky, in mN). Readings above 1000 mN are highlighted.
- Current episode / Saved this session: the running time of the episode and the total recorded time.
- Left / Right encoders: the live joint angles (J00-J14, in degrees) of each glove. Move the gloves and check that the values change.
- Warnings: problems with the camera and glove streams, such as dropped or late frames. It should read
0 activebefore you start. - Bottom bar: the current task and the keys:
Sstart recording,Ttask,Qquit.
How to record an episode
- Check that the status is Idle, the cameras are live and there are no warnings.
- Press
Sto start recording. - Perform the task.
- Press
Wto save the episode, orAto discard it. - Repeat for the next episode, and press
Qwhen you are done.
Saved data
Each episode is saved as soon as you press W.
Where the data is saved
Each session is saved in its own folder under the output/ folder of data_collection_scripts, named from the date, the devices and the task name. To save somewhere else, start the GUI with dexumi_dc --data-root <folder>.
UMIverse_software/dexumi/data_collection_scripts/
└── output/                                   <- recordings are saved here
    ├── 2026-10-31_dexL_dexR_hw1_pick-up-blue-pen/             <- one session (raw data)
    │   ├── episode_0/
    │   │   ├── left_umi_camera.mp4           wrist camera video (and right_...)
    │   │   ├── left_tracking_camera.mp4      tracking camera video (and right_...)
    │   │   ├── left_dexumi_exoskeleton_encoder/   glove joint angles (and right_...)
    │   │   ├── left_dexumi_exoskeleton_tactile/   fingertip tactile data (and right_...)
    │   │   └── zarr.json
    │   ├── episode_1/ ...
    │   ├── config.yaml                       recording settings of the session
    │   ├── device_binding.yaml               which devices were used
    │   └── DEXUMI-Left.yaml, DEXUMI-Right.yaml   glove calibrations
    ├── 2026-10-31_dexL_dexR_hw1_pick-up-blue-pen_aligned/     <- same data, time-aligned
    └── 2026-10-31_dexL_dexR_hw1_pick-up-blue-pen_lerobot/     <- LeRobot dataset (see below)
The _aligned folder holds the episodes after time alignment, and each of its episodes adds a valid_indices entry. The _lerobot folder appears once you convert the session (see Convert for training).
Output format and downstream use
This workflow produces raw and time-aligned Zarr data with MP4 videos. Keep the session settings, device bindings, and glove calibrations with the episodes: they record how each episode was captured. Wait for alignment to finish before copying or processing the _aligned session.
Convert for training
Step 05. Turn finished sessions into LeRobot datasets for training. Conversion is a separate step, so quitting the recorder is never delayed, and you choose which sessions to convert and when.
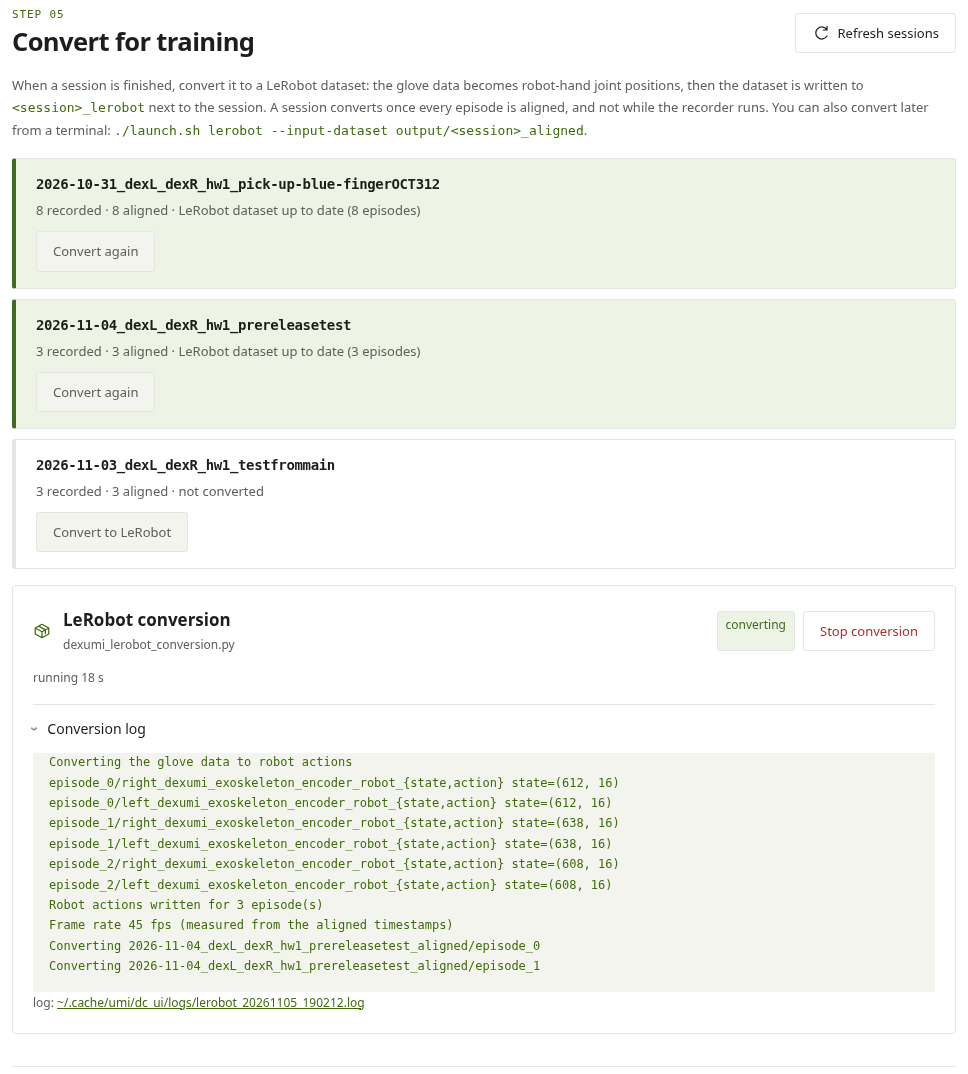
How to convert a session
- Quit the recorder with
qand wait for it to finish: a conversion cannot start while the recorder runs, since re-encoding the videos would compete with the recording. - Press Refresh sessions. Every session in the data folder is listed with its recorded and aligned episodes and the state of its LeRobot dataset: not converted, up to date, or out of date when episodes were added after the last conversion.
- Press Convert to LeRobot on the session, or Convert again to rebuild its dataset.
- Follow the progress in the Conversion log. When it finishes, the session reads LeRobot dataset up to date and the dataset is in
output/<session>_lerobot.
Stop conversion cancels a running conversion. A dataset that already exists is replaced only once the new one is complete, so stopping or a failed conversion never loses it. A session converts only when every recorded episode is aligned: if one is not, start the recorder on the same session again to finish its alignment (or align it with ./launch.sh align), then convert.
Converting from a terminal
To convert without the GUI, for example on another computer that has the data, run from data_collection_scripts:
./launch.sh lerobot --input-dataset output/<session>_alignedAdd --replace to rebuild a dataset that already exists. ./launch.sh lerobot --help lists the other options.
What the conversion writes
The conversion has two parts; the GUI and the command above run both:
- Robot actions: turns each glove's encoder angles and fingertip forces into robot-hand joint positions and torques, using the glove calibration saved in the session and a model of the X Hand each glove mirrors (
umi/control/robot/configs/xhand_<side>.yaml, or the calibration'shand_config). For both hands, each episode of the aligned session gains:- in
<side>_dexumi_exoskeleton_encoder_robot_state/:state_interp, the 16 robot-hand joint positions per frame (rad), andjoints_torque_interp, the per-joint torque from the fingertip forces (N·m). - in
<side>_dexumi_exoskeleton_encoder_robot_action/:action_interp(the joint positions) andaction_torque_interp(positions and torques side by side).
config/dexumi/robot_action.yaml../launch.sh convert --aligned-dir output/<session>_aligned --sequentialruns this part alone. - in
- LeRobot dataset: each frame holds, per hand:
<side>_tracker.eef: the hand's iPhone pose (position in m and 6D rotation, 9 values), used as both state and action. It is the raw iPhone pose; no glove-mount offset is applied.<side>_hand.joint_positions(state) andaction.<side>_hand.joint_positions(action): the 16 robot-hand joint positions from part 1.action.<side>_hand.joint_torques(action): the joint torques (N·m) from part 1.<side>_hand.tactile(state): the fingertip forces in N, 30 values: fx, fy, fz at both measurement points of each sensor 33–37 (thumb to pinky).
Sessions without tactile data. The conversion needs the fingertip forces, so the GUI's Convert to LeRobot fails for a session recorded without the tactile sensors. Convert such a session from a terminal with --no-tactile:
./launch.sh lerobot --input-dataset output/<session>_aligned --no-tactilePart 1 then writes only the joint positions (state_interp and action_interp), and the dataset has no joint_torques or tactile columns.
The wrist camera videos (and the head camera's, when recorded) are exported at full size and as 320x240 versions, with each camera's intrinsics. The iPhone videos are not exported. The frame rate is the aligned session's (45 fps on the station rig); --fps overrides it.