Software Guide
How to set up the station and record demonstrations with the GEAR_UMI Station Console. This guide covers the two supported gripper setups: Bimanual (iPhone) and Bimanual (Vive).
Environment set up
Use an Ubuntu x86_64 station with a desktop session, Python 3.12, and uv installed. The recorder opens a desktop preview window, and gripper calibration opens a terminal. Connect two assembled grippers with their wrist OAK cameras, USB trigger cameras, and the tracking devices for your setup.
Tested platforms: the UMI data-collection software has been tested on Ubuntu 24.04 x86_64 and Ubuntu 22.04.5 LTS.
1. Set up the station once
Install the system packages:
sudo apt update
sudo apt install -y git git-lfs curl ffmpeg v4l-utils libzbar0 gnome-terminal
From your checkout, run:
cd <repository>
git lfs install
git lfs pull
bash UMIverse_software/umi/data_collection_scripts/scripts/setup_station.sh
Run the setup script as yourself, without sudo. It installs the shared UMI/DexUMI Python environment, offers to configure gripper serial access, and installs command shortcuts. Accept the serial-access steps; they request sudo when needed. If you were added to dialout, log out and back in. Opening a new terminal is not enough.
The OAK cameras also need a USB permission rule, which the script does not install:
echo 'SUBSYSTEM=="usb", ATTRS{idVendor}=="03e7", MODE="0666"' | sudo tee /etc/udev/rules.d/80-movidius.rules
sudo udevadm control --reload-rules
sudo udevadm trigger
Replug the cameras if they still report a permission error.
2. Launch the UMI console
Run from the repository root:
cd <repository>
uv sync
uv run umi_dc
Note: run
uv syncat the repository root, not inside the UMI folder, so the shared environment keeps both pipelines' dependencies.
The console opens at http://127.0.0.1:8770/. Keep the server terminal running. uv run umi_dc --no-open skips opening the browser; uv run umi_dc --help lists the options. After station setup, umi_dc is also available through the shortcut in ~/.local/bin.
Tracking set up
Follow the subsection for your rig before assigning devices in the console.
iPhones
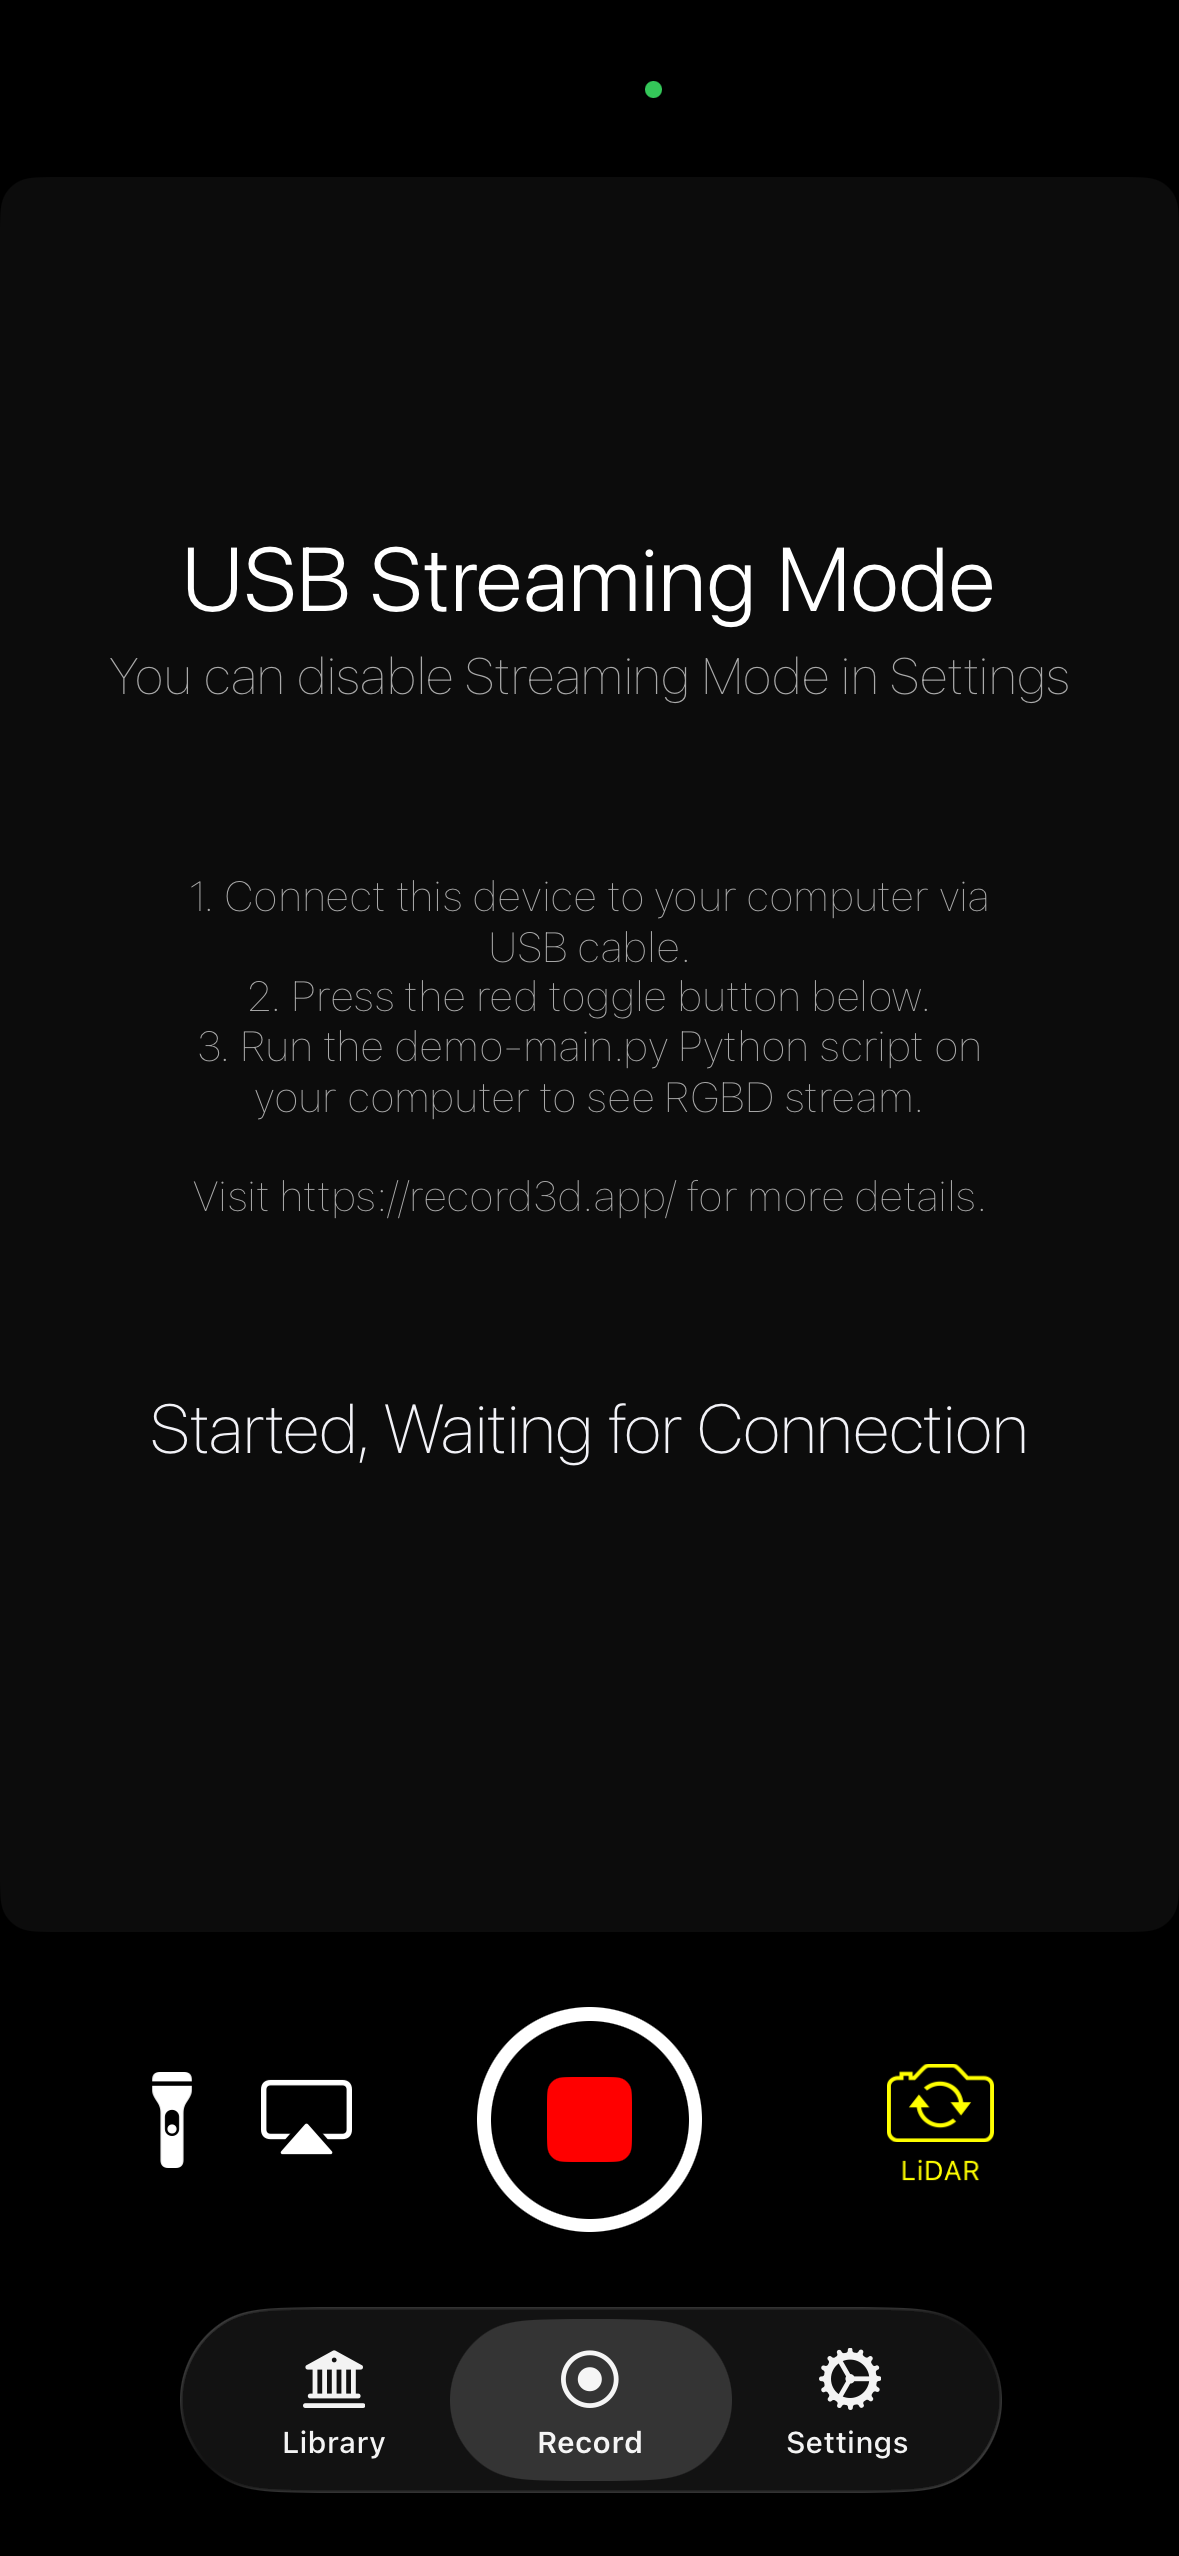
Each hand's iPhone streams its camera to the station through Record3D over USB. Complete these steps on every phone.
1. Install Record3D
Download Record3D from the App Store and open it.
2. Enable Guided Access
- With Record3D open, triple-click the side button to enter Guided Access.
- Enter the Guided Access passcode if prompted (the same passcode you use to unlock the phone).
- Keep Record3D in the foreground while collecting data.
3. Configure Record3D
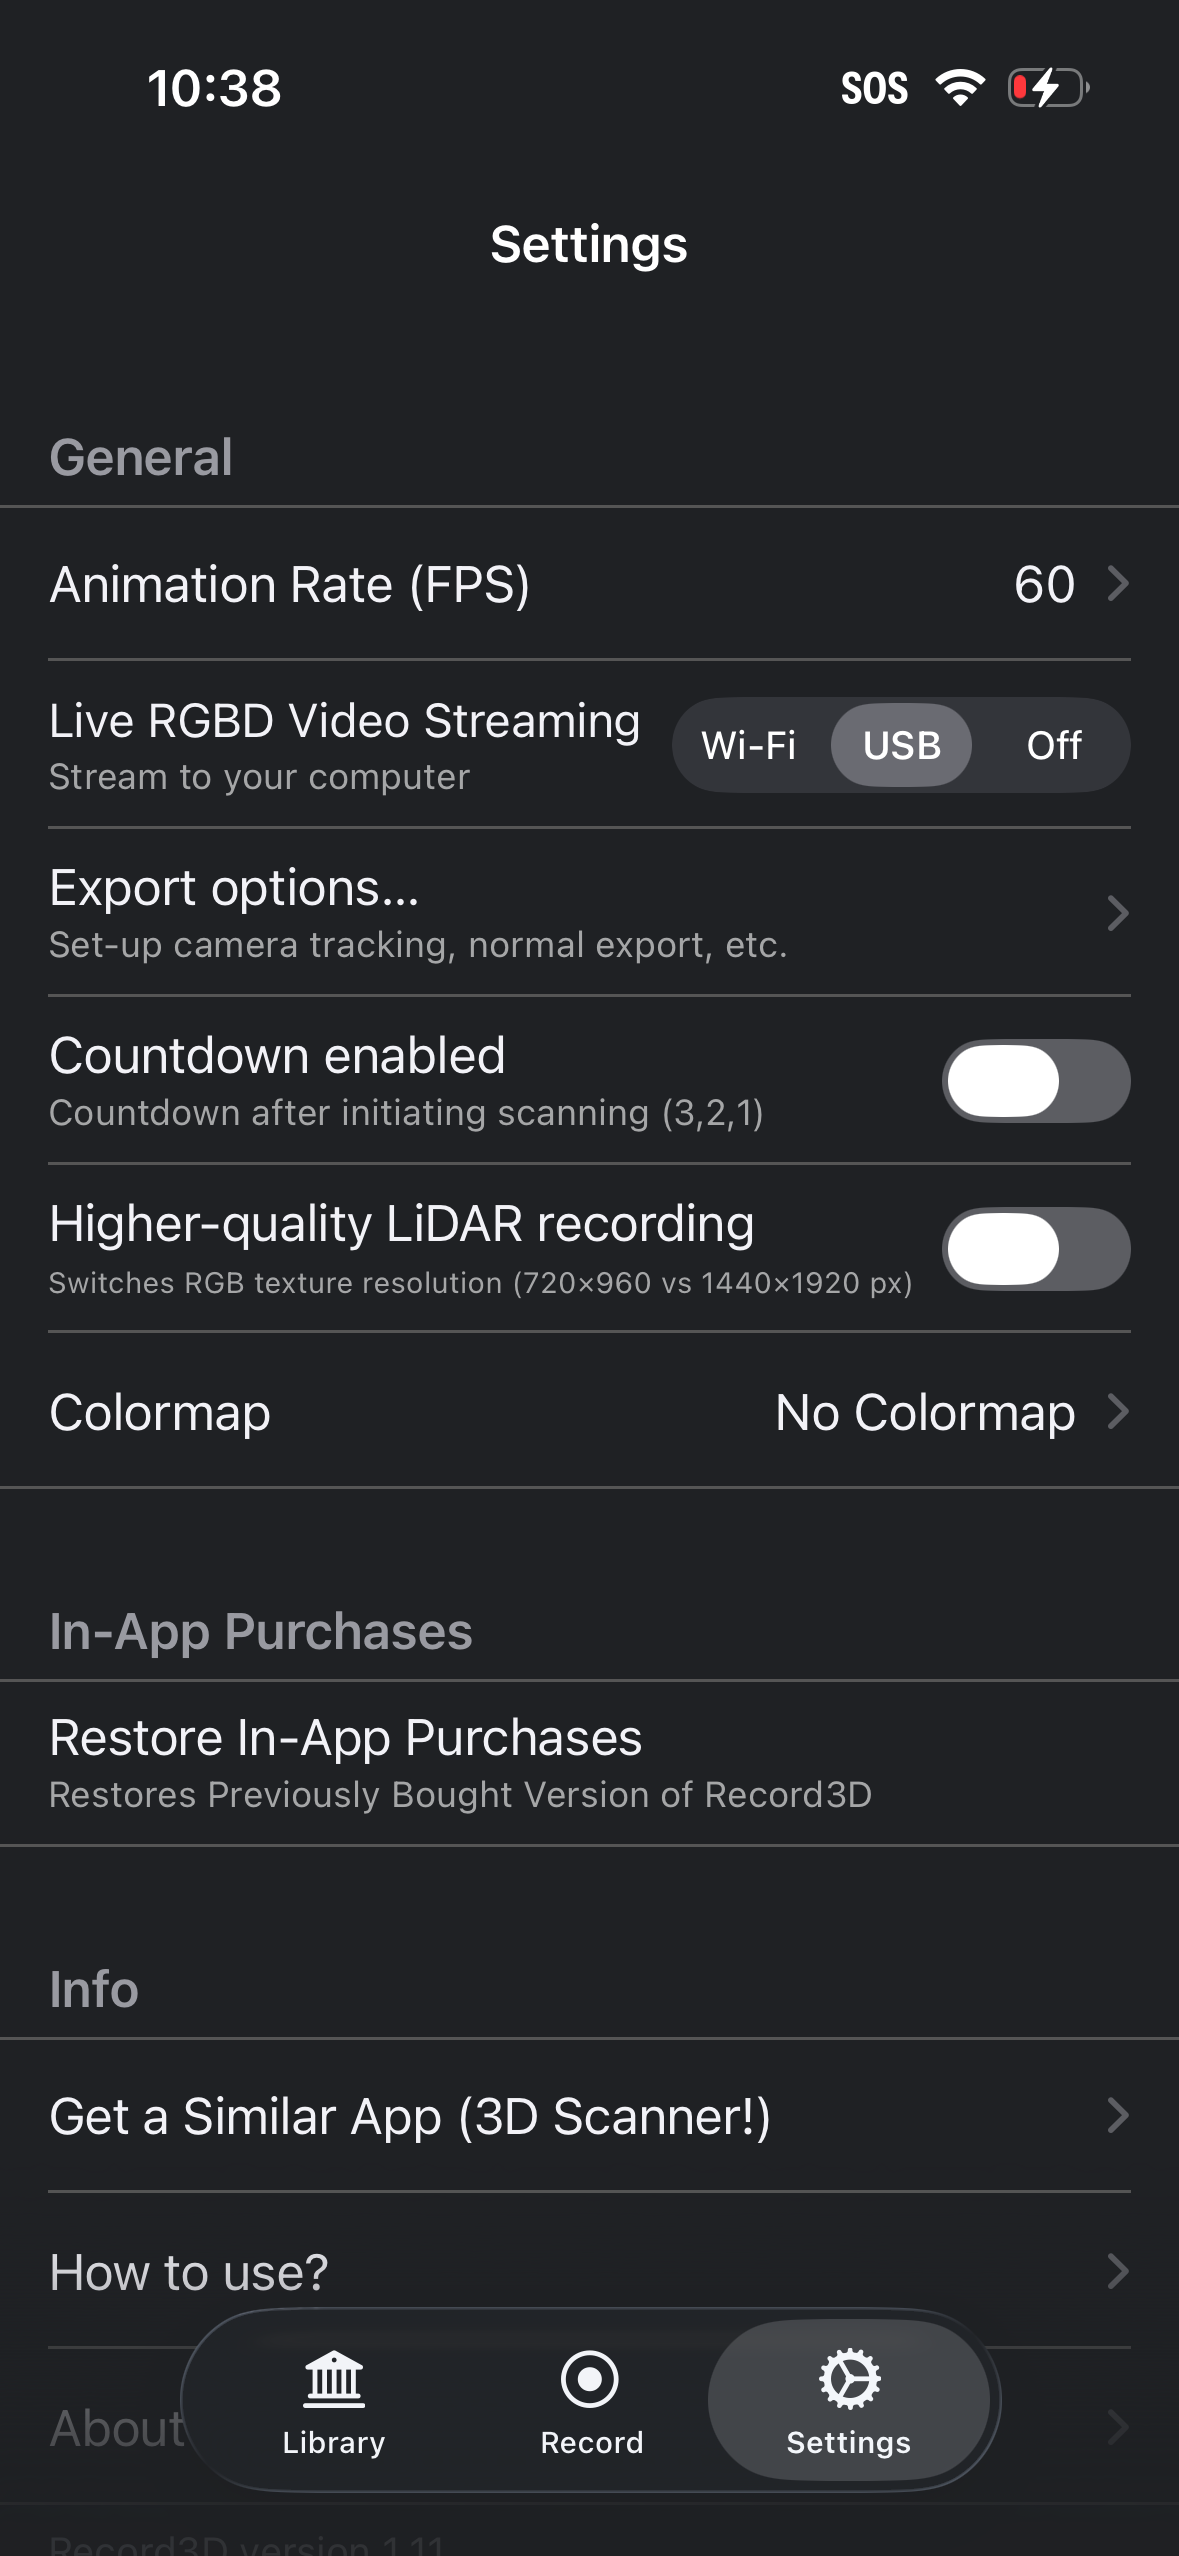
- Open the Record3D settings and set Live RGBD Video Streaming to USB.
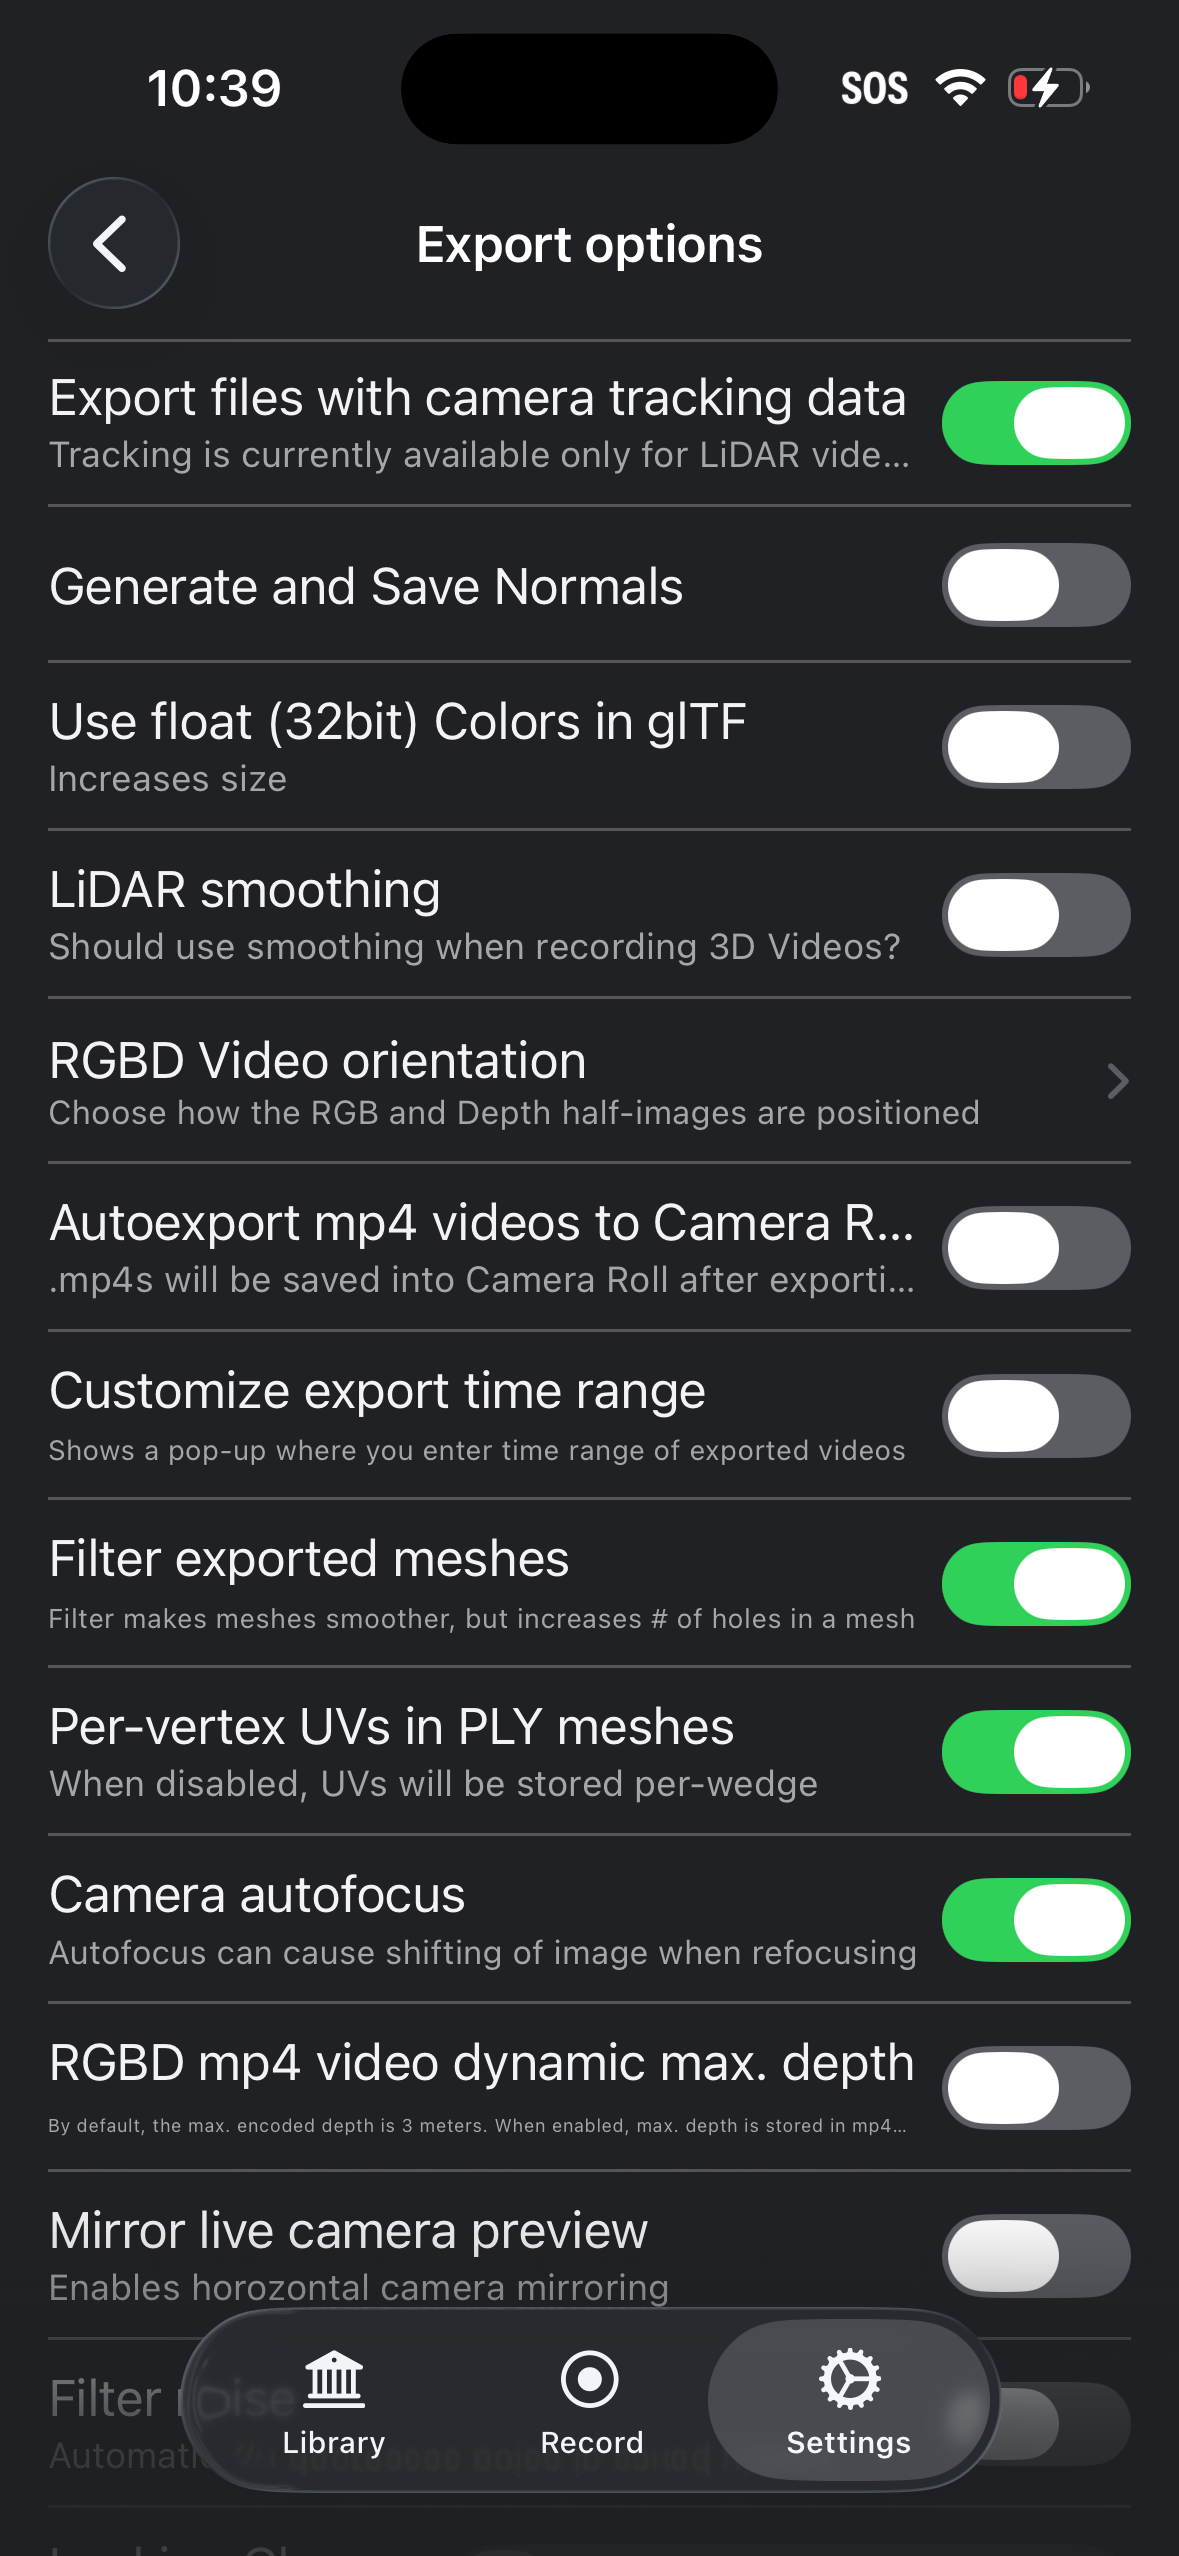
- Open Export options and enable Export files with camera tracking data, Filter exported meshes, Per-vertex UVs in PLY meshes and Camera autofocus.
4. Start streaming and connect
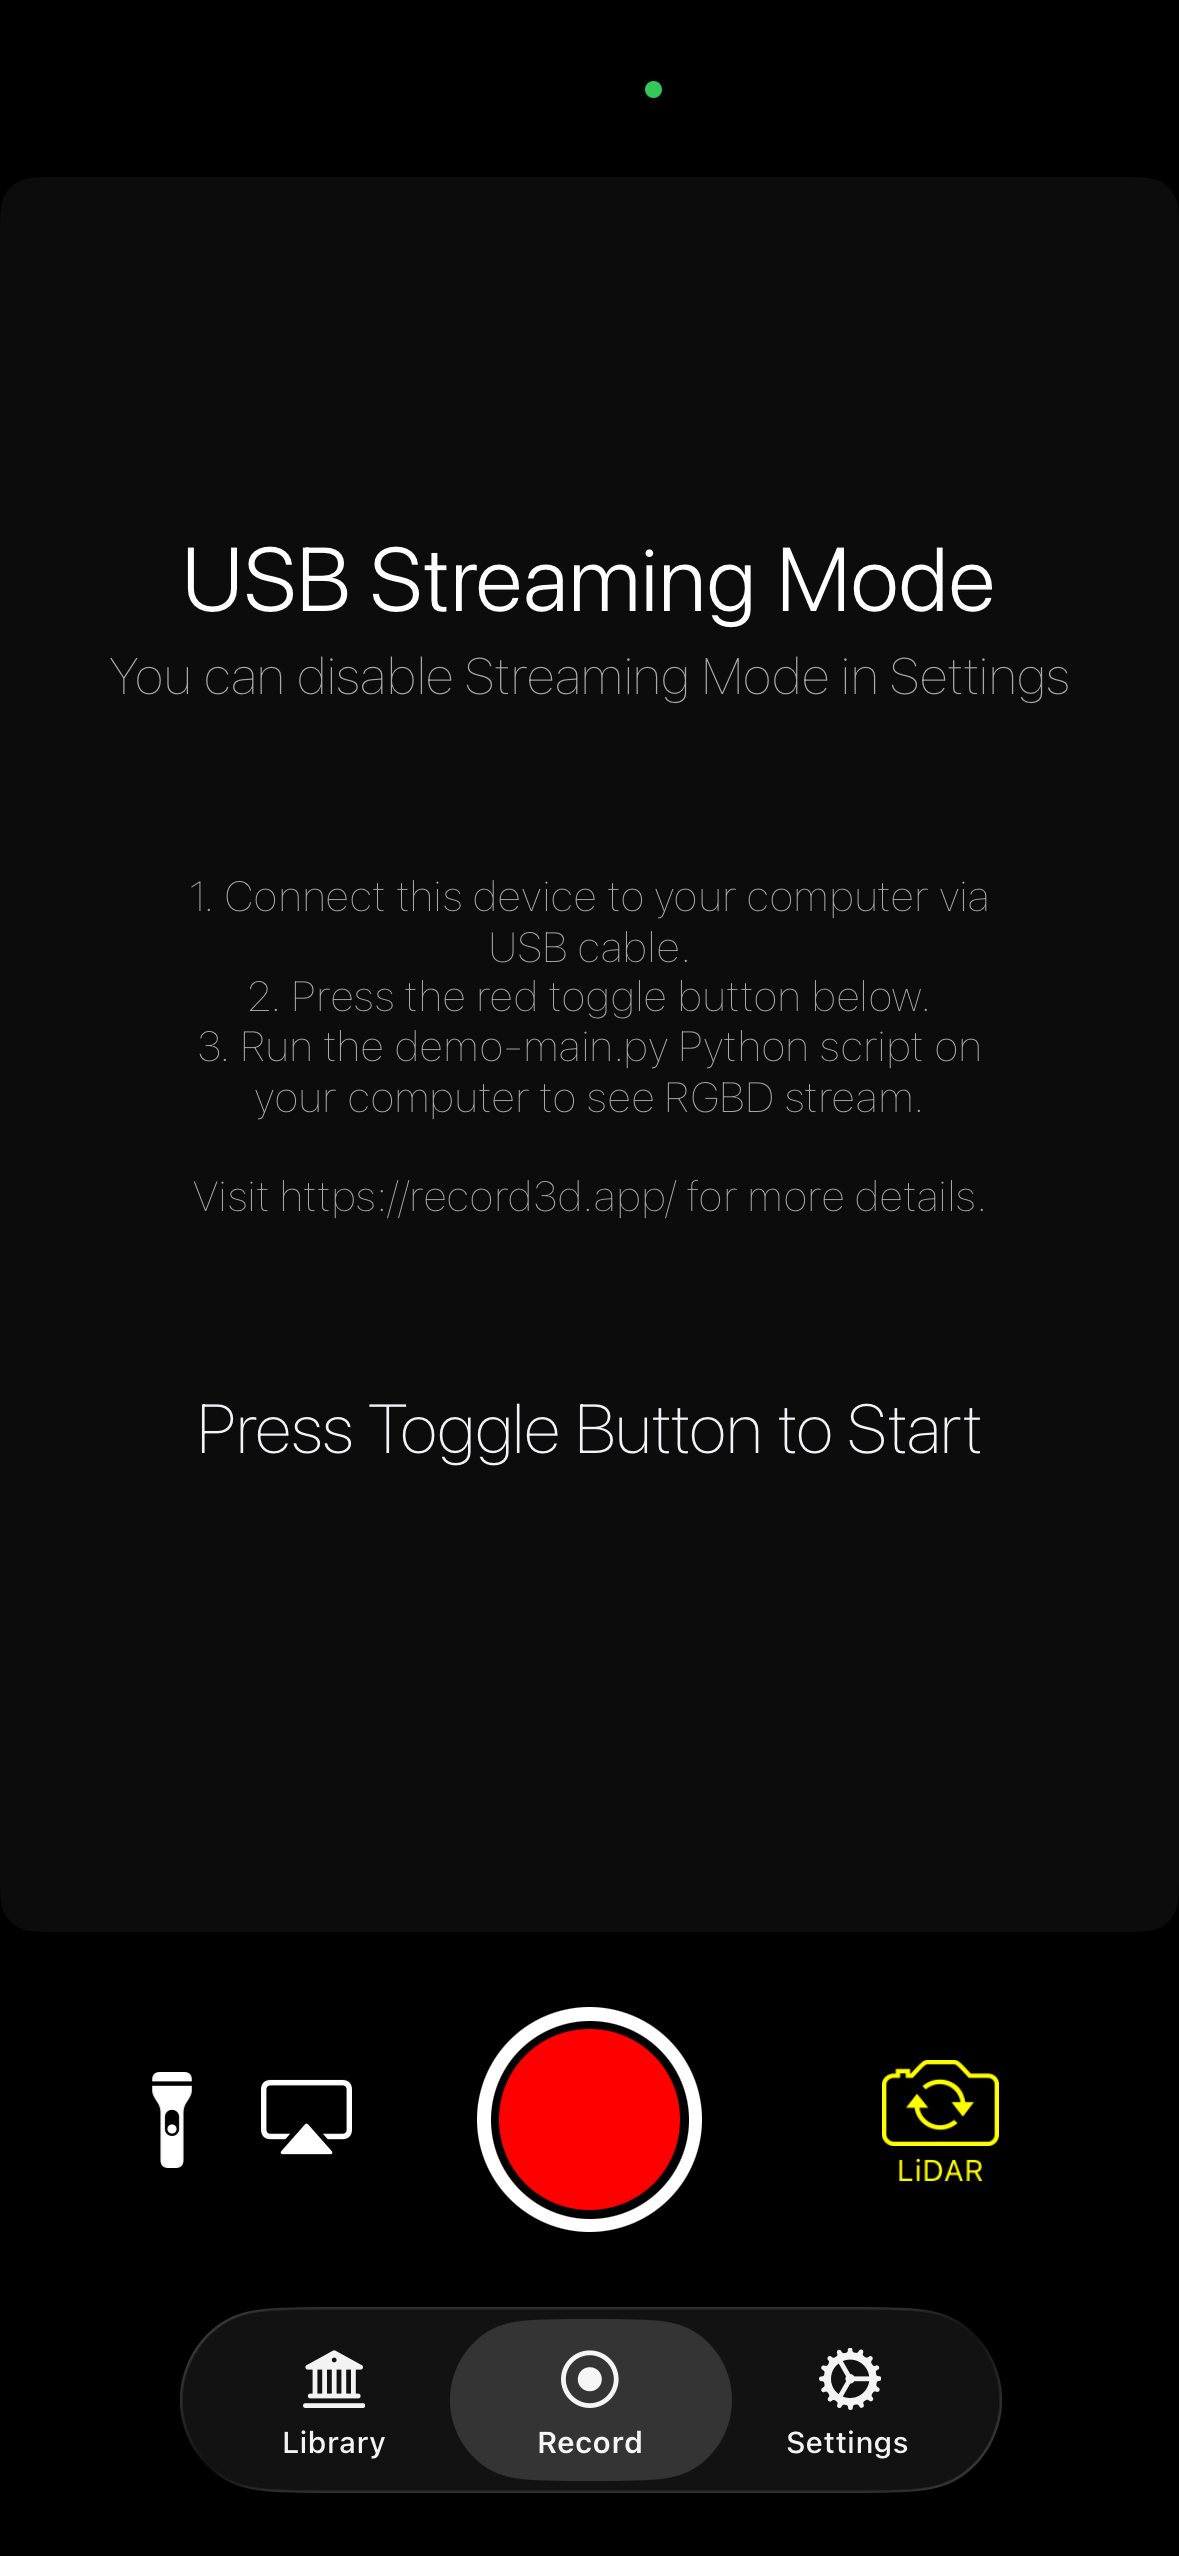
- Select Record in Record3D's bottom menu and press the red circular control to start streaming.
- Mount the phone on its gripper and connect it to the station with a USB-C cable.
Vive trackers
The trackers stream poses from a separate Windows tracker host. The grippers and cameras connect to the Ubuntu recording station.
- Complete the Vive server setup once on the Windows host.
- Start SteamVR, set it as the active OpenXR runtime, and turn on both trackers. Confirm that both are tracking and visible to the base stations.
- In Manage Vive Trackers, give each tracker a distinct role, such as
left_kneeandright_knee. Trackers without a role are not reported. - Start the Vive server on the Windows host with
vive_server.py, run from the folder that contains it (see the setup guide above). The script is provided in this repository atUMIverse_software/umi/data_collection_scripts/real_scripts/vive_server/vive_server.py. - Note the host's IPv4 address (
ipconfigin another terminal). Keep SteamVR and the server running during collection.
The SteamVR role is a tracker key; verify which physical gripper it belongs to during calibration.
Data collection
The console has Setup, Configuration, Calibration, Record, and Data Audit on one scrolling page. Use the sidebar to move between sections.
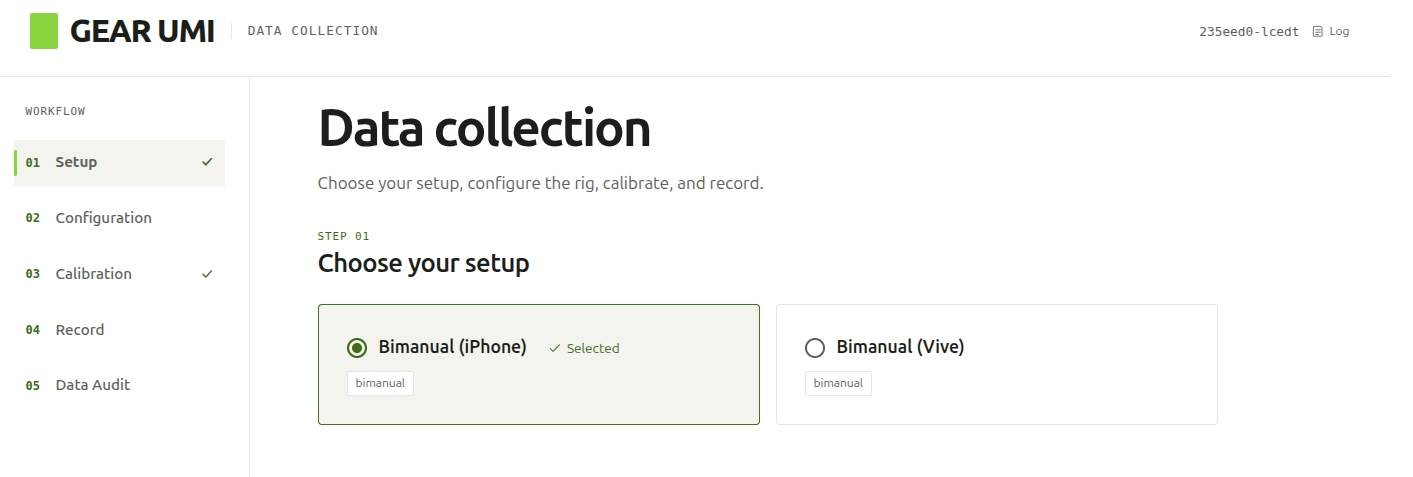
Choose the setup
In Setup, choose Bimanual (iPhone) or Bimanual (Vive) to match the rig, then continue to Configuration.
Device assignment
In Configuration, assign the connected hardware to the correct side.
- Press Refresh devices and wait for detection to finish.
- Select each side's Gripper. The detected-device table groups cameras under their gripper when their USB connections can be matched.
- Press Identify Cameras and wait for live previews.
- Aim the left gripper's wrist OAK camera, USB trigger camera, and iPhone (if used) at the on-screen marker. Point the other gripper's cameras away. Once the marker is visible in the previews, press Scan left.
- When the left cameras show Identified, press Next: right and repeat for the right gripper.
- Press Done to close the dialog and release the cameras. Review every assignment before continuing.
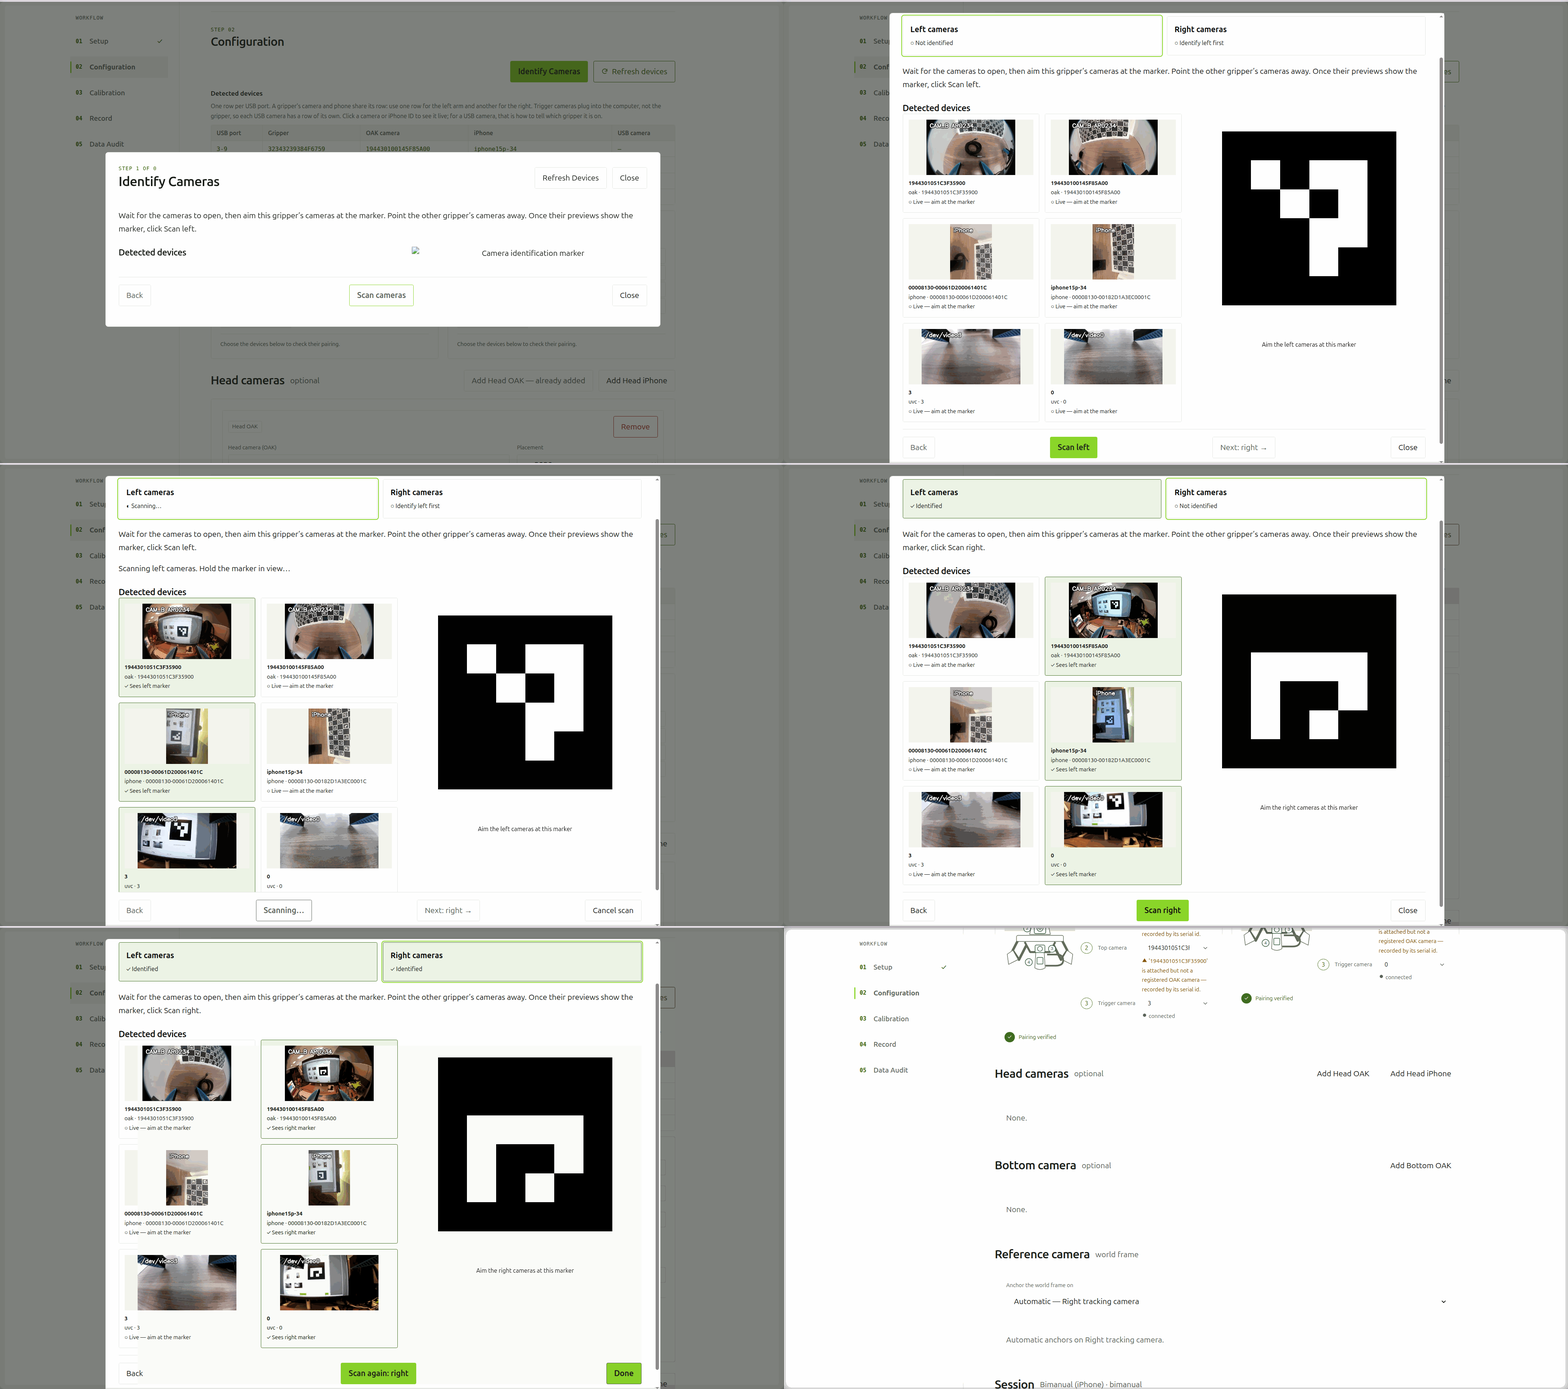
Successful scans fill the camera fields. They also fill the gripper field when USB connections identify its board unambiguously; otherwise, select the gripper manually.
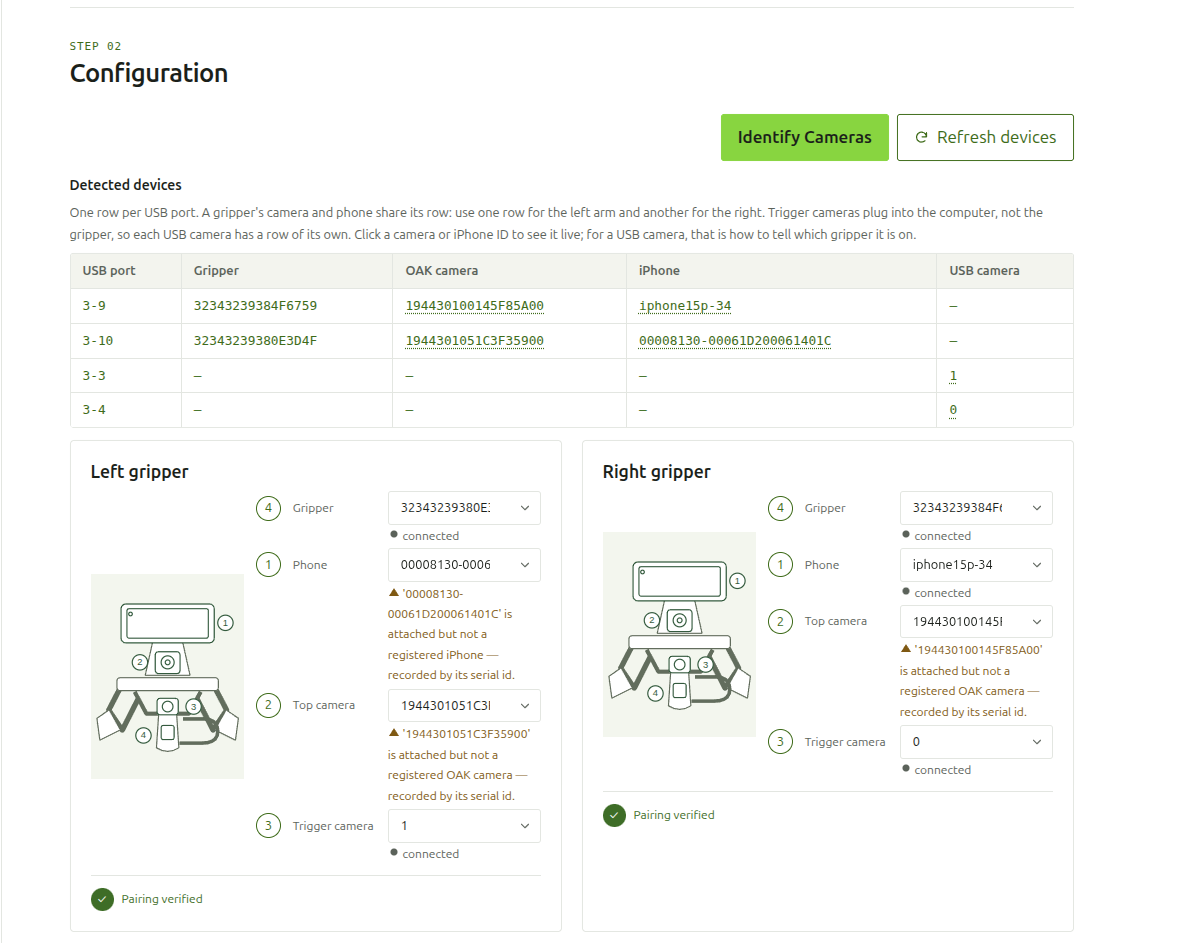
You can assign cameras manually instead. Click a camera ID in the detected-device table to inspect its preview, then select it in the correct field. Close previews before starting another camera action.
Optional head and bottom cameras
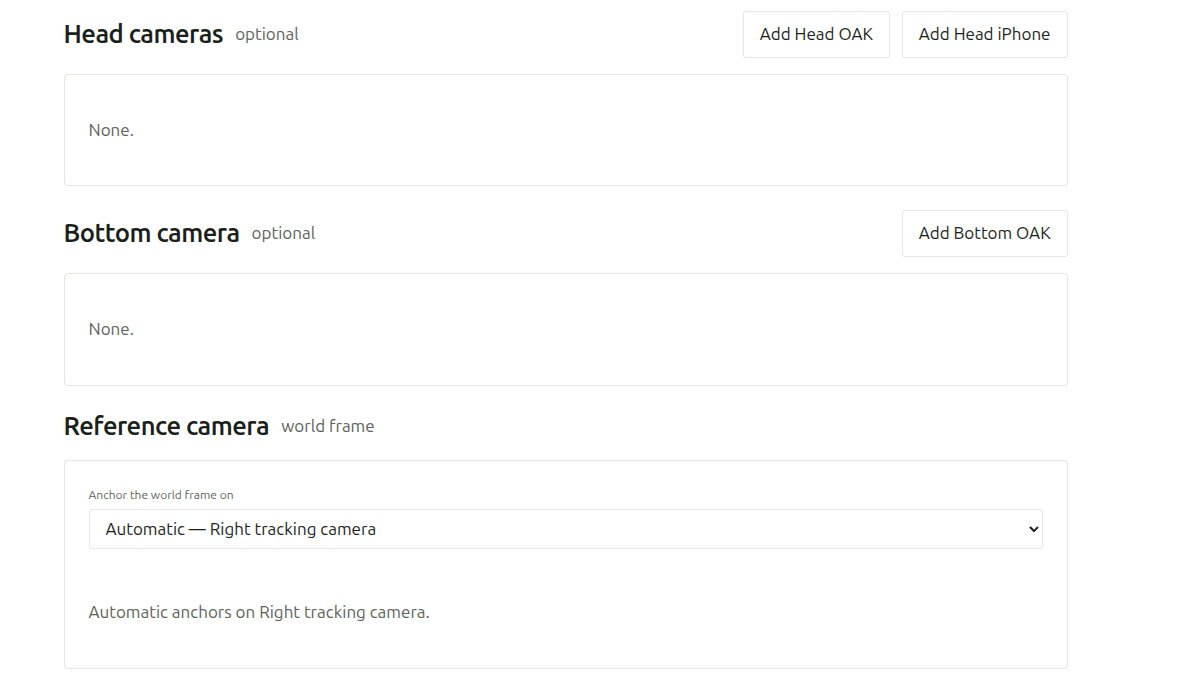
New sessions start without a head or bottom camera. Add one only if it is connected and needed for this session, using Add Head OAK, Add Head iPhone, or Add Bottom OAK, then select its device.
If a device is not found
Read the reported error, check its cable and USB permissions, and replug it if needed. For an iPhone, restart Record3D and start USB streaming again. Press Refresh devices, or Refresh Devices inside the identify dialog. Refreshing the dialog clears identification results, so scan both sides again.
Vive server and tracker assignment
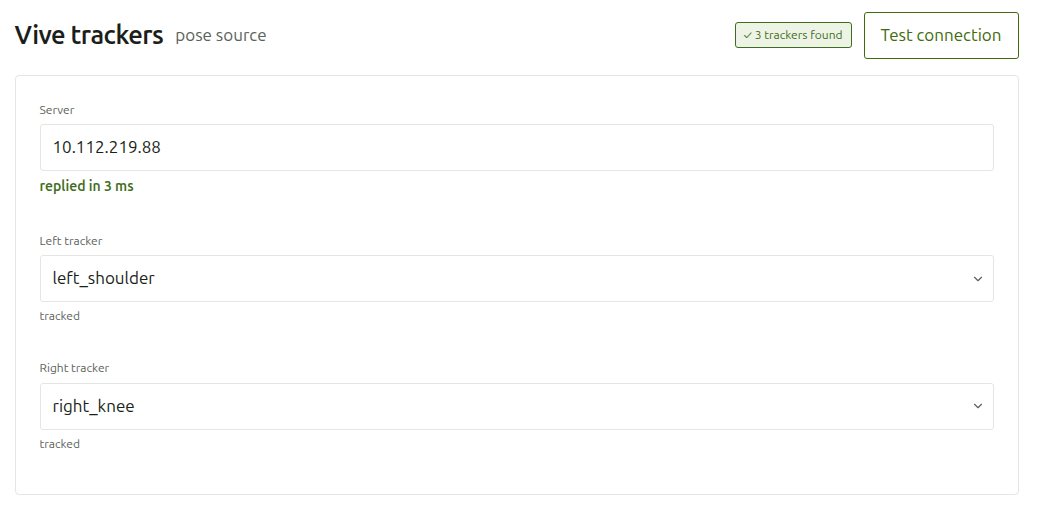
For a Vive rig, also complete Vive trackers in Configuration:
- Enter the Windows host's IP address in Server, for example
192.168.1.20. For another port, use a full endpoint such astcp://192.168.1.20:6000. - Press Test connection and confirm both intended tracker keys are reported as tracked.
- Assign a different key to each gripper, using the live server list.
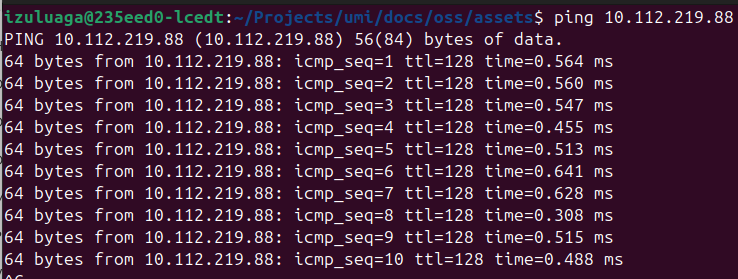
Tip: before testing, confirm that the recording station can reach the Windows host by running ping <host-ip> in a terminal on the station.
Reference camera
Under Reference camera → Anchor the world frame on, leave Automatic unless your collection setup specifies another camera. Review Automatic anchors on. This selects the camera used as the world-frame reference for board calibration and alignment.
Session details
In Configuration → Session:
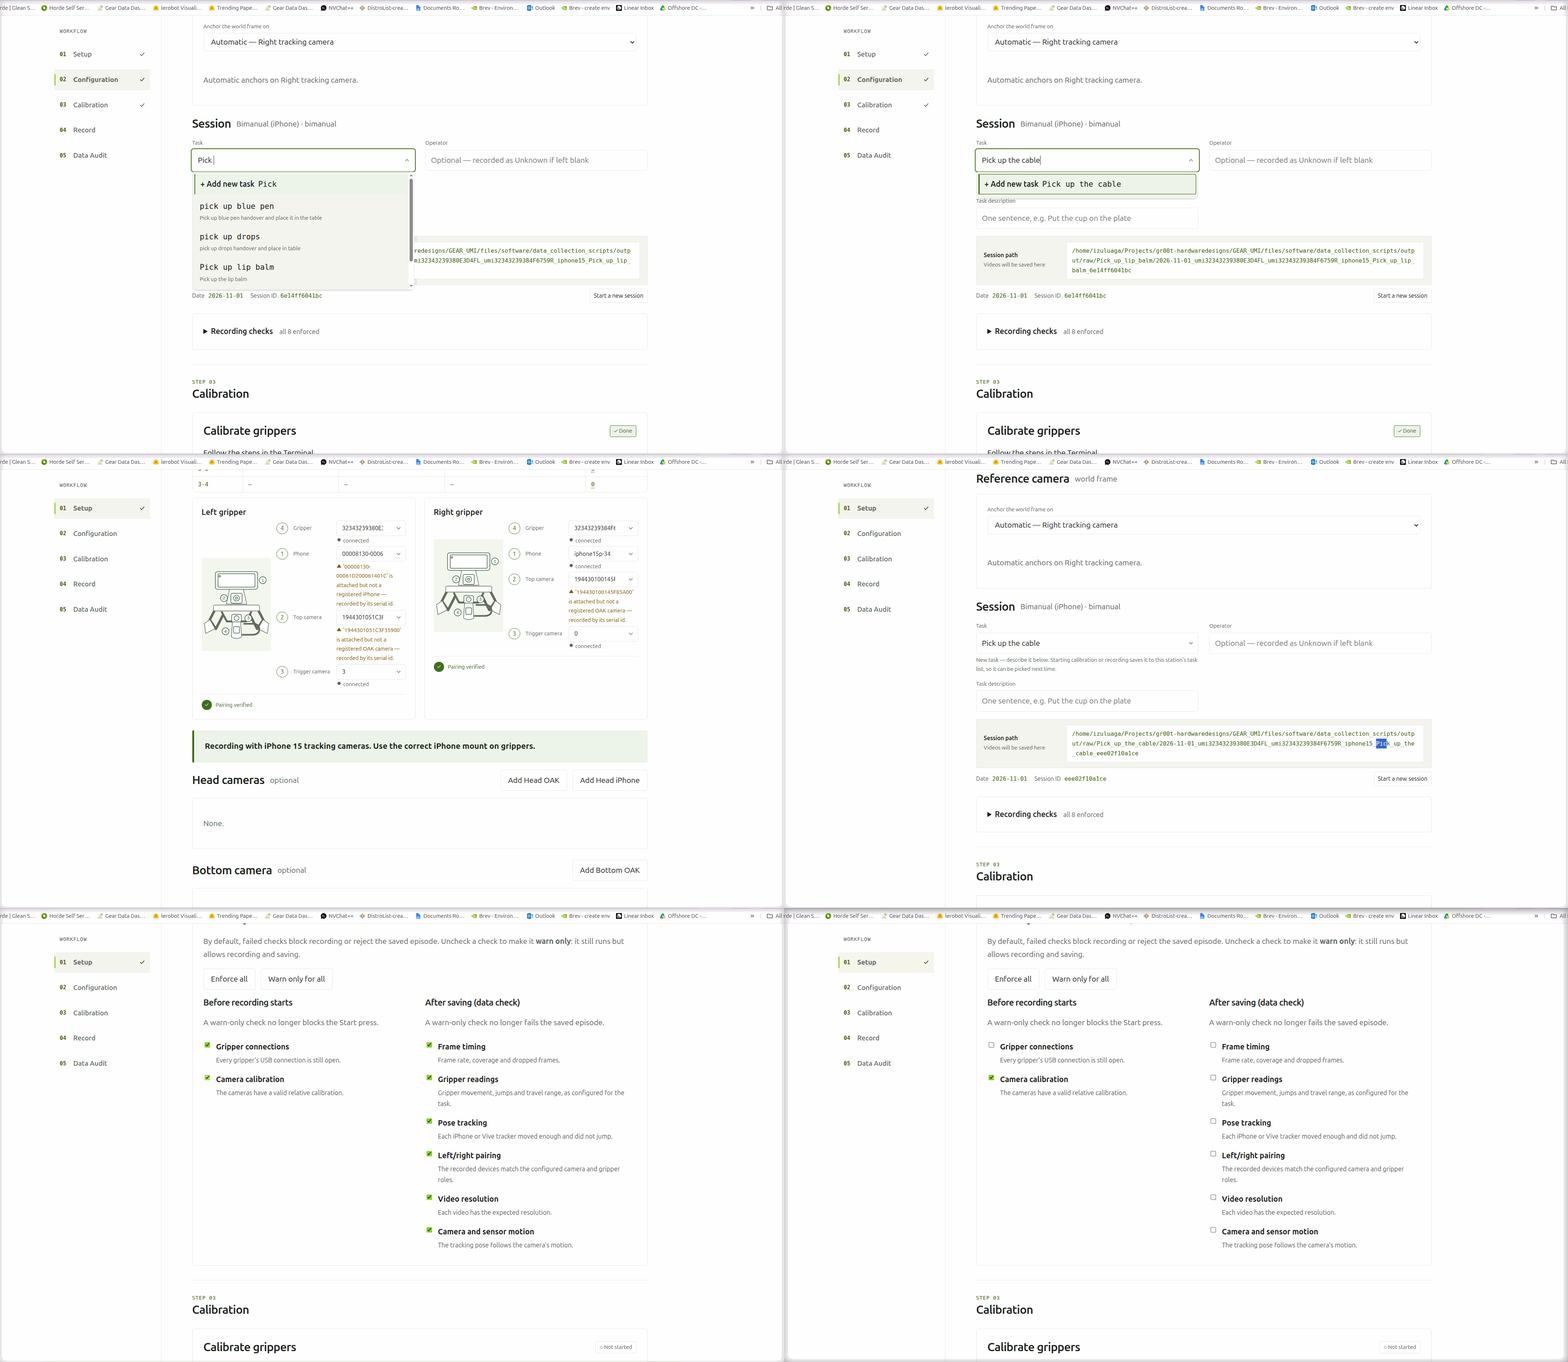
- Task: select an existing task, or type a new title and choose Add new task. Entering a description is optional; a blank description is recorded as
Unknown. - Operator (optional): recorded as
Unknownwhen empty. - Session path: check that this is the intended recording destination. Use Start a new session when beginning a separate session, then check the path again.
Configuration is validated and saved when you start a calibration, camera check, or recording. Editing session details or starting a new session with the same hardware keeps completed hardware checks valid; changing devices requires the relevant checks again.
Recording checks
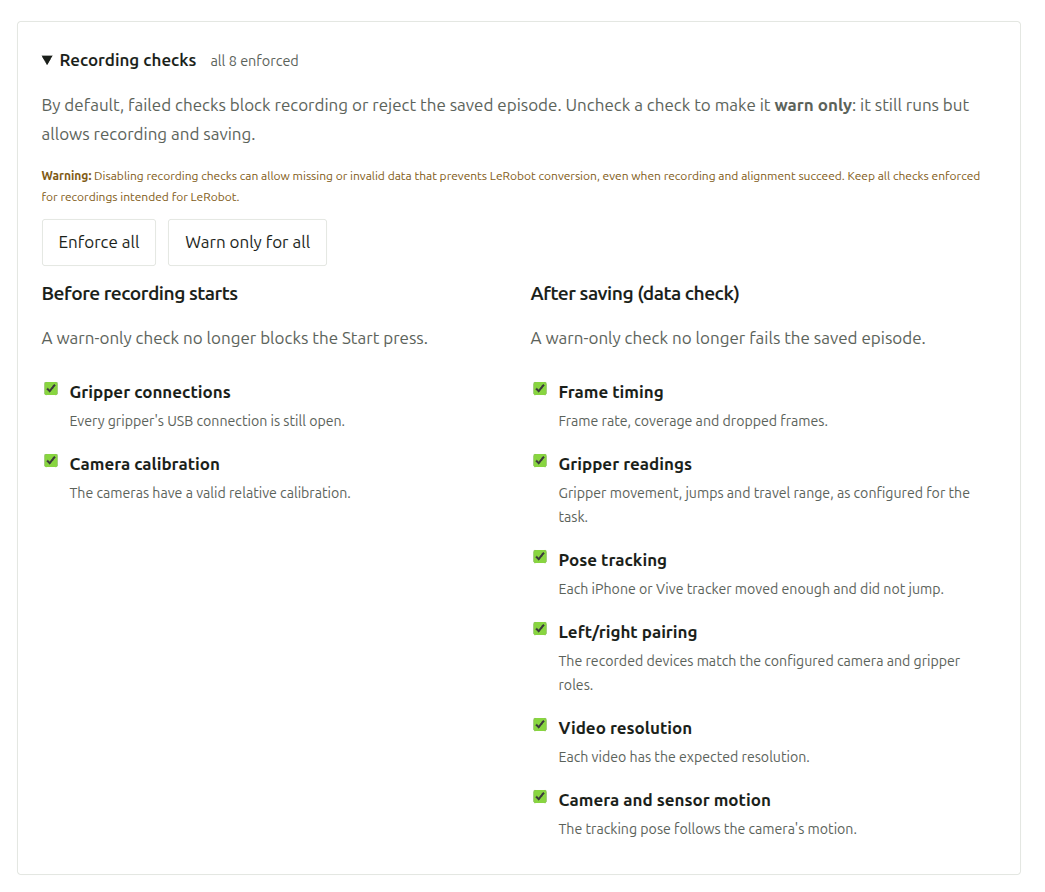
Keep all checks enforced for data collection. In Recording checks, unchecking a check makes it warn only: it still reports problems, but no longer blocks recording or rejects the episode. Enforce all and Warn only for all change every check at once.
Warning: Disabling recording checks can allow missing or invalid data that prevents LeRobot conversion, even when recording and alignment succeed. Keep all checks enforced for recordings intended for LeRobot.
- Before recording: check gripper connections and camera calibration.
- After saving: check frame timing, gripper readings, pose tracking, left/right pairing, video resolution, and camera/sensor motion.
Calibrate
1. Check camera assignments
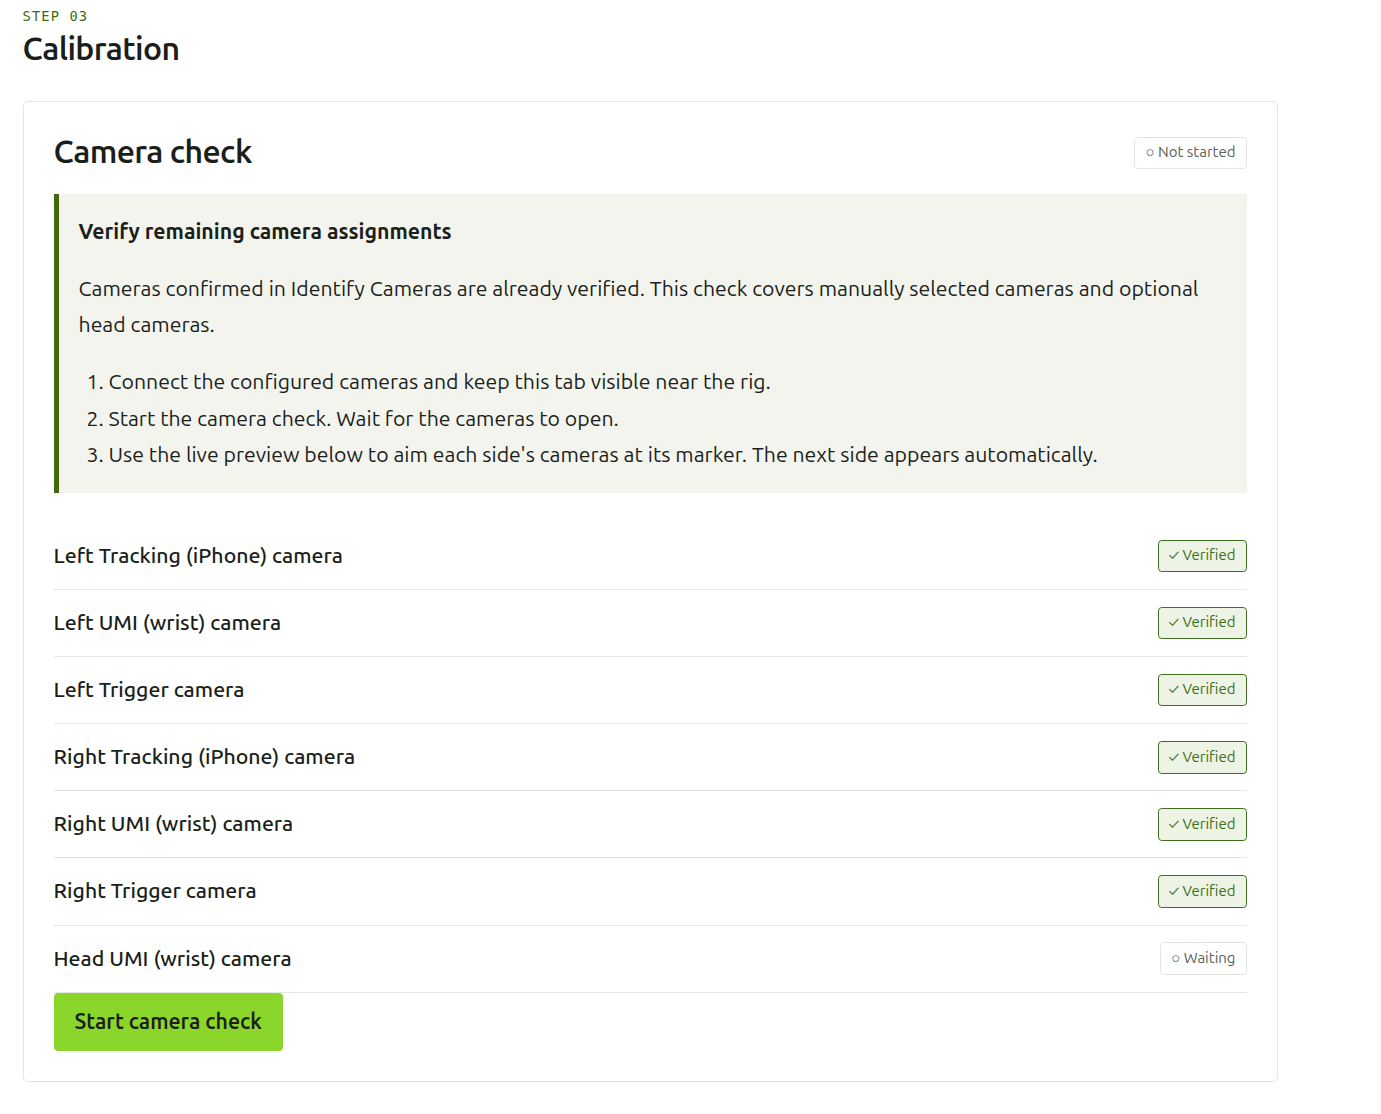
In Calibration, complete Camera check if it is shown. Cameras verified through Identify Cameras are already covered; this step checks remaining manual assignments and optional head cameras.
- Press Start camera check and wait for the live preview.
- Aim the requested side's cameras at its on-screen code. Keep the other side pointed away.
- Wait for confirmation, then follow the prompt for the next side. Show any configured head cameras their head marker too.
- Resolve missing-camera or wrong-side errors before continuing.
This checks camera identity. The printed-board calibration happens later in the recorder.
2. Check Vive trackers, if used
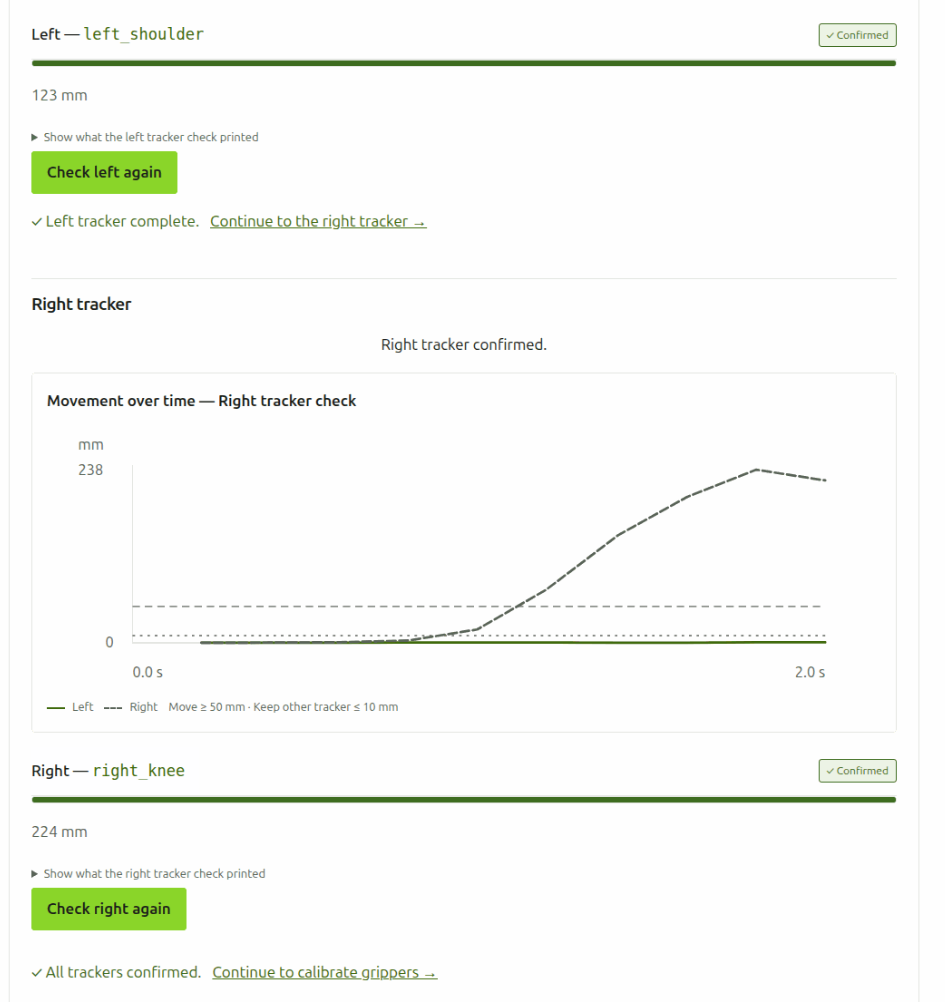
- Press Check left tracker. Move only the physical left gripper, keeping the right still and both trackers visible to the base stations.
- Watch the browser's movement plot until the left tracker is confirmed.
- Press Check right tracker and repeat with only the right gripper moving.
If the keys appear swapped, correct them in Configuration and repeat the checks.
3. Calibrate the gripper ranges
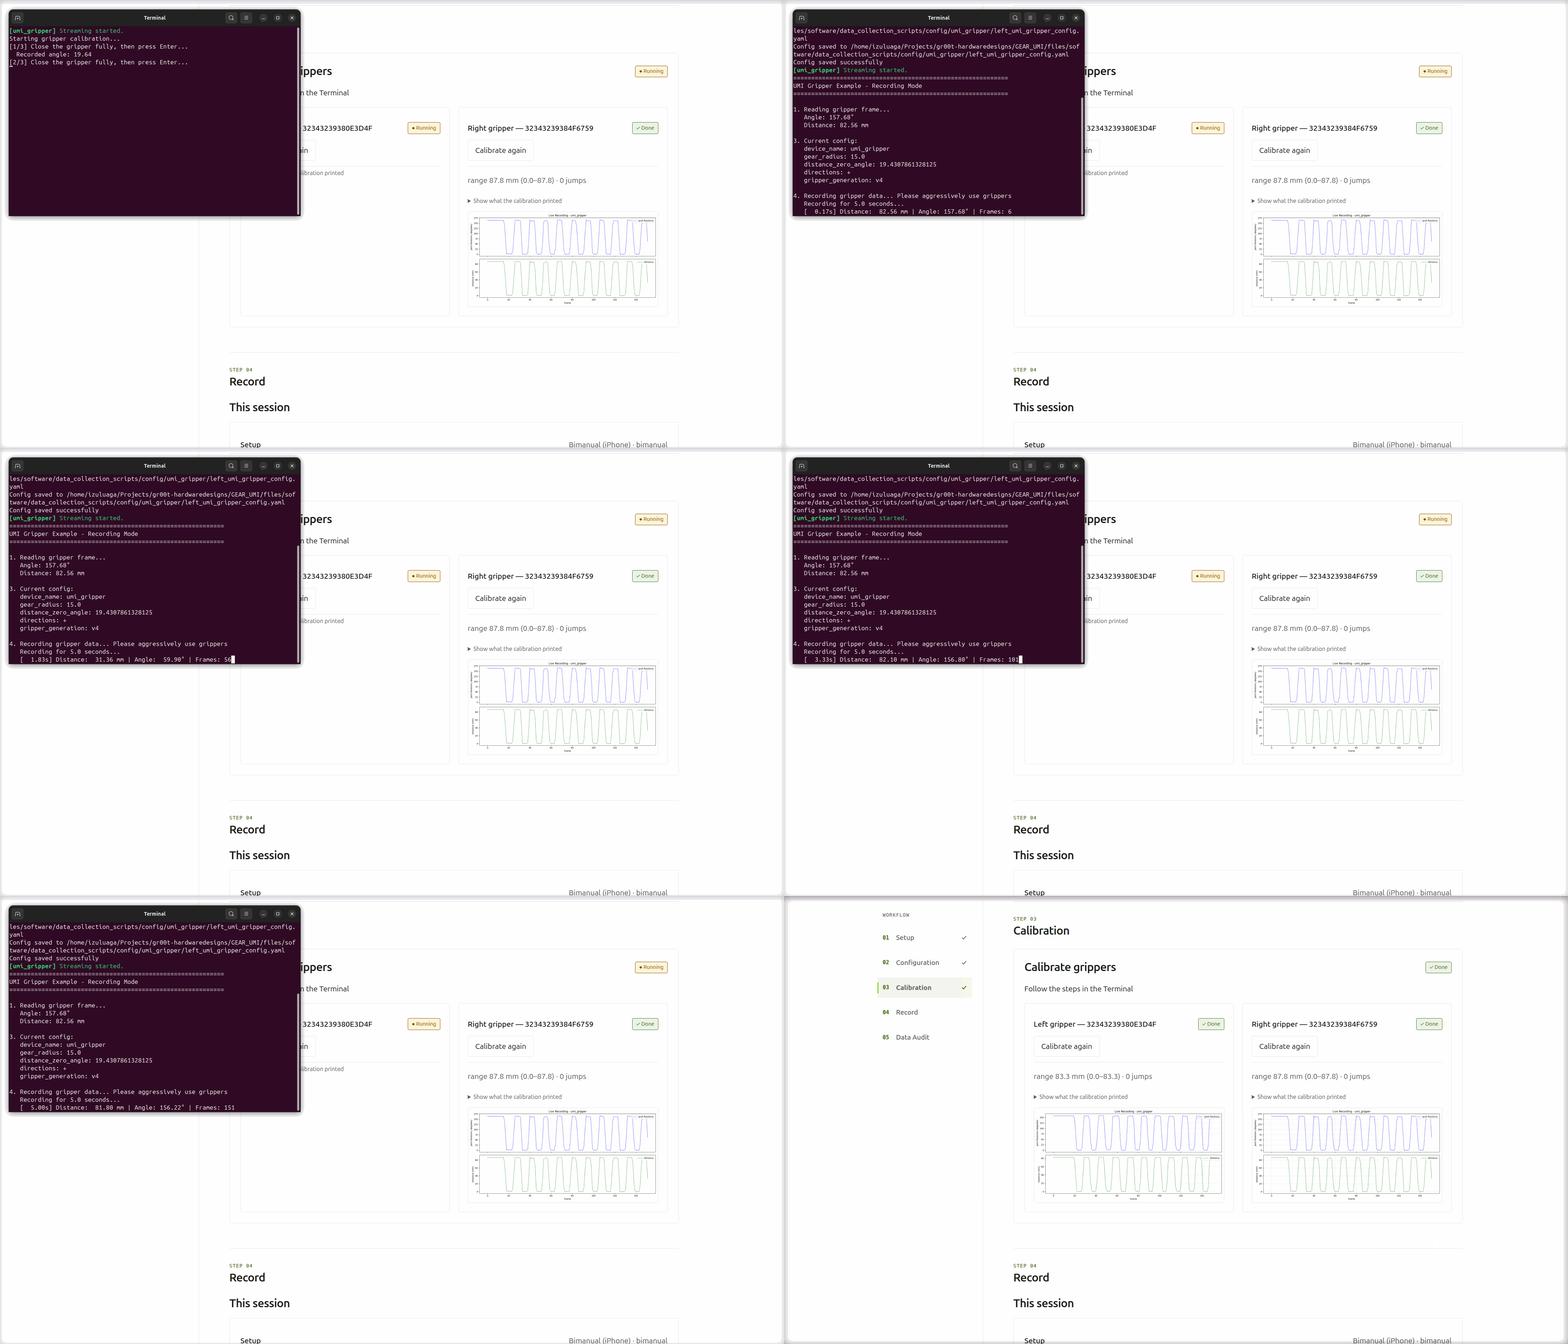
For each gripper, press Calibrate under Calibrate grippers. A terminal opens on the station:
- Fully close the gripper and press Enter at each of the three closed-position prompts.
- Fully open it and press Enter when requested.
- Open and close it repeatedly during the short recording pass (five seconds).
- Wait for the result in the console. Complete both grippers and resolve any failures before recording.
If a measurement fails, follow the terminal's retry prompt. If the mechanism remains faulty, use its hardware-fault option and have the gripper checked.
Calibrations are saved automatically as config/umi_gripper/left_umi_gripper_config.yaml and right_umi_gripper_config.yaml, relative to this guide's folder. Use Calibrate again to repeat a calibration.
4. Prepare the printed board
Generate the ChArUco board once, from the UMI software folder:
cd <repository>/UMIverse_software/umi/data_collection_scripts
uv run python -m real_scripts.data_collection.generate_charuco_board --output charuco_board.png
Print at 100% scale, with no fit-to-page resizing: 560 × 360 mm at 300 DPI. Check with a ruler that each square is 40 mm. The default board has 14 × 9 squares, 30 mm markers, and dictionary DICT_5X5_1000. Use a board that matches the recording configuration.
Record data
In Record, resolve any items under Before you start, then press Start recording and confirm. This opens the recorder's live preview on the station desktop. Click that window to give it keyboard focus.
Record an episode
- Check that all camera views are live and show the correct sides. Move the grippers to confirm their readings change. Follow any displayed task instructions and placement grid.
- Point the required calibration cameras at the printed ChArUco board and press
sto begin board calibration. Hold the board steady and visible to all cameras requested by the calibration overlay until it shows DONE. - Press
sto continue to the starting pose. Arrange the scene and take the starting pose for the task. - Press
sagain. The pre-recording checks run; once they pass and recording starts, perform the demonstration. - Press
wto stop and save, orato discard the current episode. - After saving, wait for Data check PASSED and the episode to be finalized. If it fails, read the findings, correct the problem, and press
rto acknowledge a recoverable error. - Repeat for the next episode. Both shipped setups require board calibration before every episode.
| Key | Action |
|---|---|
s |
Advance through board calibration and the starting pose; the final press starts recording |
w |
Stop and save the current episode, then run the data check |
a |
Discard the current episode, or reset preparation |
g |
Change the placement-grid layout when available and not recording |
r |
Acknowledge a recoverable error after addressing it |
q |
Quit the recorder |
Before quitting: press
wand wait for the data-check verdict. Pressingqwhile recording discards that episode; pressing it while the check is pending can discard the pending episode too.
After the final verdict, press q and let shutdown finish; queued alignments may take time. Use w for episode saves; the console's Stop recording control ends the recorder process.

Data check
Each saved episode is checked automatically. Passing episodes are finalized; episodes that fail an enforced check are moved to quarantine for review. Warnings alone do not reject an episode.
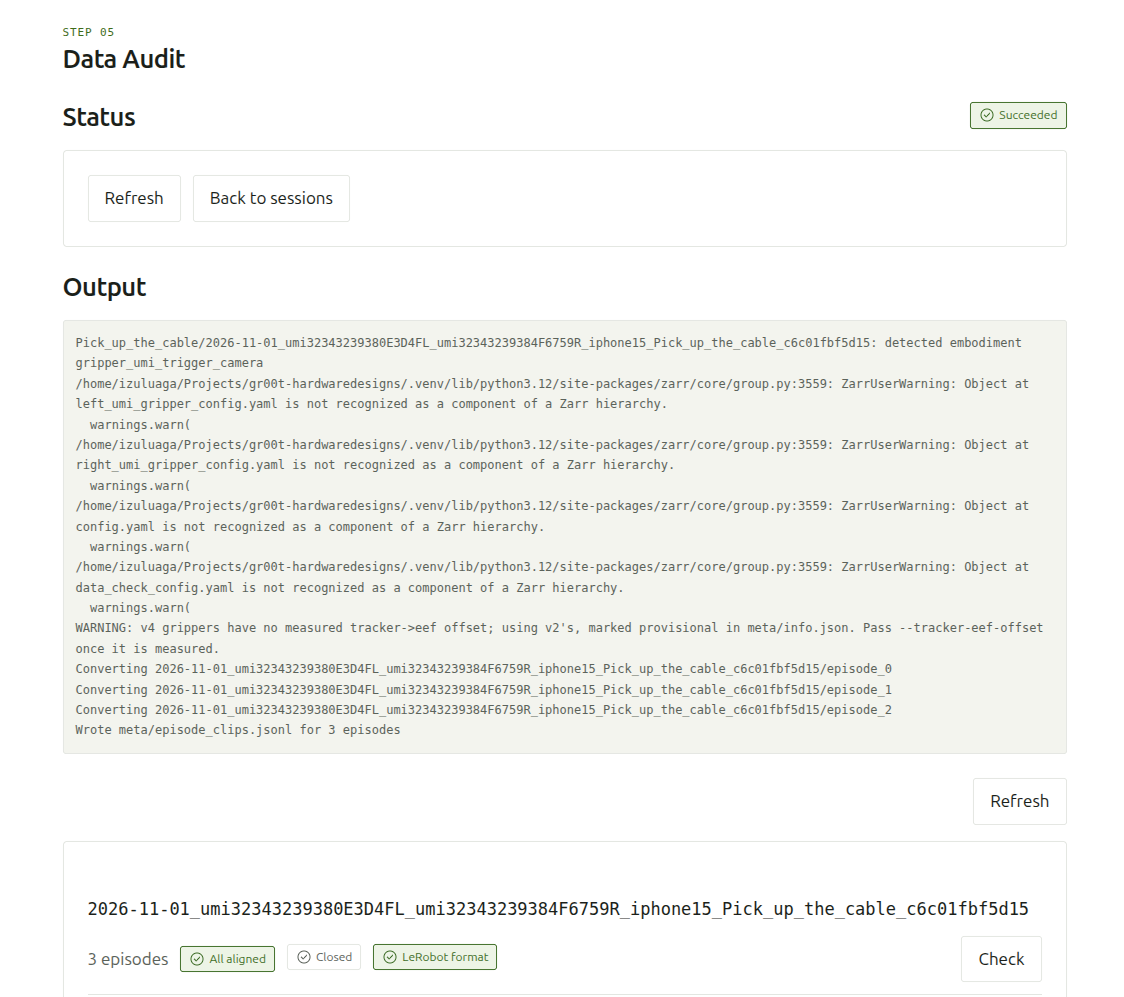
Open Data Audit to review the session's episodes, findings, and alignment status. The most recently recorded session is listed first; if it is missing, press Refresh. Use Check to inspect completeness and Re-align to regenerate missing or incomplete aligned copies. Episodes are aligned automatically in the background.
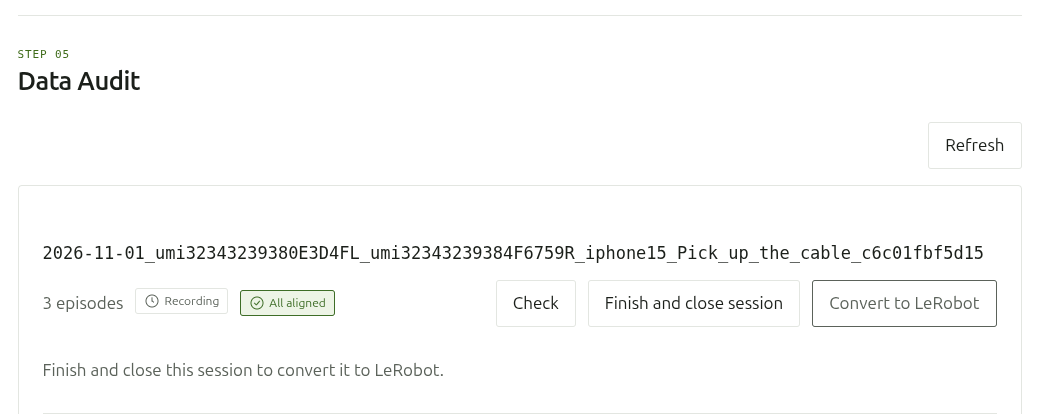
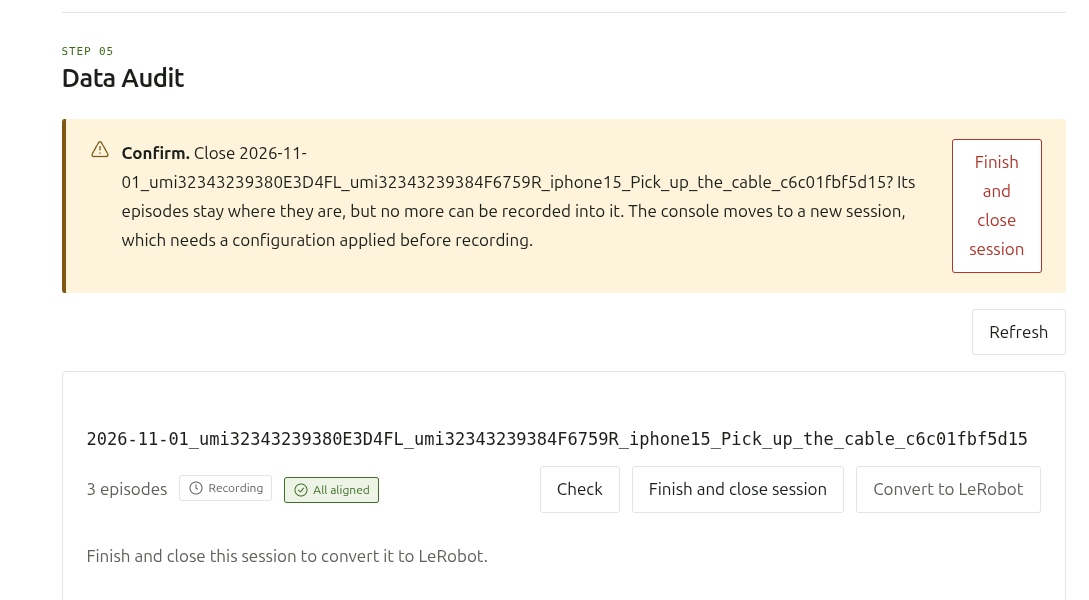
Closing the recorder does not close the session. If you launch recording again, new episodes are added to the same session. When the session is complete, press Finish and close session and confirm. A session must be closed before it can be converted to LeRobot format.
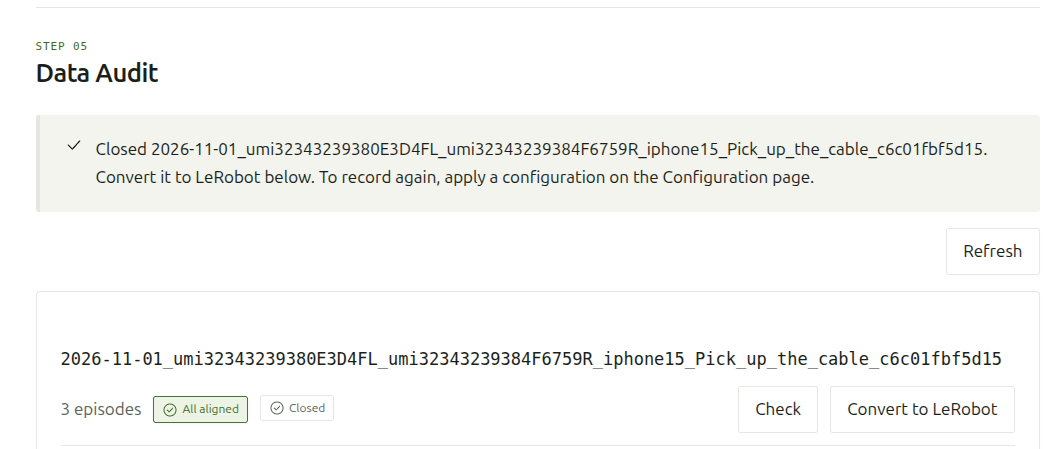
The session now shows a Closed badge, and the console asks you to apply a configuration before recording again.
Finally, press Convert to LeRobot. The status shows Succeeded, and the session gets a LeRobot format badge.
Where the data is saved
The default destination is the UMI software folder's output/ directory. The console shows the current session's exact path in Configuration and Record.
UMIverse_software/umi/data_collection_scripts/output/
├── raw/<task>/<session>/          accepted episodes and session settings
├── aligned/<task>/<session>/      time-aligned copies of accepted episodes
└── quarantine/<task>/<session>/   episodes that failed enforced checks
Episodes are named episode_0/, episode_1/, and so on. A saved episode temporarily remains in an episode_N.pending/ folder while its check runs. Session names include the date, grippers, tracking setup, task, and session ID. Background alignment is enabled in both shipped setups; wait for it to finish before reviewing the aligned data.
For LeRobot export, exit the recorder, use Finish and close session in Data Audit and confirm, then Convert to LeRobot on the closed session. All accepted episodes need completed alignment first.
Vive server setup (Windows + SteamVR)
How to install everything vive_server.py needs on the tracker host, using either a
conda environment or a uv virtual environment.
What the script needs
| Requirement | Version known to work | Why |
|---|---|---|
| Windows 10/11 | — | The SteamVR time fix uses the Windows performance counter |
| SteamVR, set as the active OpenXR runtime | current Steam build | Provides the trackers through OpenXR |
| Python | 3.10.18 | pyopenxr needs 3.9 or newer |
pyopenxr (imported as xr) |
1.1.5001 | OpenXR bindings |
pyzmq (imported as zmq) |
27.1.0 | Serves pose data to clients |
click |
8.1.8 | Command-line options |
numpy, glfw, PyOpenGL |
2.2.6, 2.10.0, 3.1.10 | Installed automatically with pyopenxr |
Nothing else is needed. If you reuse an environment set up for other tools, the server ignores its extra packages (open3d, pyrealsense2, opencv-python, redis, ...).
The commands below use two placeholders; replace them with the folders on your tracker host:
<server-dir>: the folder that holdsvive_server.py(real_scripts\vive_serverin a clone of this repository, or wherever you copied the script).<pyopenxr-dir>: your local clone of pyopenxr, installed as an editable install. Installingpyopenxr==1.1.5001from PyPI also works if you don't have a clone.
1. SteamVR (both options)
- Install SteamVR from Steam and start it once.
- SteamVR → Settings → OpenXR → Set SteamVR as OpenXR Runtime.
- Pair the trackers, then SteamVR → Manage Vive Trackers → give every tracker a role (waist, left_foot, ...). Trackers without a role are not reported.
Check the active runtime:
Get-ItemProperty "HKLM:\SOFTWARE\Khronos\OpenXR\1" | Select-Object ActiveRuntime
# Expect: ...\steamapps\common\SteamVR\steamxr_win64.json
2a. Conda environment
conda create -n vive_server python=3.10 -y
conda activate vive_server

# pyopenxr from the local clone (editable), plus the server's own dependencies
pip install -e <pyopenxr-dir>
pip install pyzmq==27.1.0 click==8.1.8

# No local clone? Use PyPI instead of the editable install:
# pip install pyopenxr==1.1.5001
2b. uv virtual environment
Install uv once (pick one):
winget install --id=astral-sh.uv -e
# or
powershell -ExecutionPolicy ByPass -c "irm https://astral.sh/uv/install.ps1 | iex"
Open a new terminal so uv is on PATH, then create the environment next to the script:
cd <server-dir>

# uv downloads Python 3.10 itself if it isn't installed
uv venv --python 3.10 .venv

uv pip install --python .venv -e <pyopenxr-dir>
uv pip install --python .venv pyzmq==27.1.0 click==8.1.8

# No local clone? Use PyPI instead:
# uv pip install --python .venv pyopenxr==1.1.5001
Activate it:
.\.venv\Scripts\Activate.ps1
If PowerShell refuses to run the activation script, allow local scripts once with
Set-ExecutionPolicy -Scope CurrentUser RemoteSigned, or skip activation and call the
interpreter directly: .\.venv\Scripts\python.exe vive_server.py.
3. Verify the install
With the environment active and SteamVR running:
python -c "import xr, zmq, click; print('pyopenxr', xr.__version__, '| pyzmq', zmq.__version__)"

python -c "import xr; e = xr.enumerate_instance_extension_properties(); [print(n, n in e) for n in ('XR_MND_headless', 'XR_HTCX_vive_tracker_interaction', 'XR_KHR_win32_convert_performance_counter_time')]"
All three extensions must print True.
Don't run these from inside <pyopenxr-dir>\src\xr. That folder has its own
platform package, which hides Python's built-in platform module and breaks the import
with partially initialized module 'platform'.
4. Run the server
cd <server-dir>
python vive_server.py              # listens on tcp://*:5555
python vive_server.py --port 6000  # different port
Expected output, about once a second: N trackers are found. Running fps = ...
Troubleshooting
| Symptom | Fix |
|---|---|
TimeInvalidError: The provided basetype:XrTime was zero |
The script lacks the SteamVR time fix (the get_current_xr_time() fallback). Run the vive_server.py from this repository, which includes it. |
0 trackers are found |
Assign a role to each tracker in SteamVR → Manage Vive Trackers; make sure they're tracking (solid green). |
ExtensionNotPresentError on startup |
SteamVR isn't the active OpenXR runtime (step 1), or SteamVR is outdated. |
ModuleNotFoundError: No module named 'xr' |
pyopenxr isn't installed in the environment you're running; activate the right env. |
This OpenXR session never entered the FOCUSED state |
SteamVR isn't running or another OpenXR app has focus. |