Software Guide
The neck’s three SteadyWin GIM3505-9 actuators run on GDK drive boards and share one CAN bus at 1 Mbit/s. The GEAR Neck software is a small Python package that brings them up, sets the neck’s home position and drives it: give it yaw, roll and pitch angles and the neck turns there, and read the same angles back. Its source is in files/software/neck_control/; the drives’ protocol, registers and vendor manual are in files/firmware/.
Install
The package, gear-neck, needs Python 3.10 or newer and only python-can. It installs with uv. If uv is not installed yet, install it once, then open a new terminal so uv is on the PATH:
curl -LsSf https://astral.sh/uv/install.sh | shInstall the package with uv, from the repository root:
cd <repository>
uv sync --package gear-neckuv sync --package gear-neck installs only the neck software and removes packages that only the other projects need. On a station that also runs the UMI or DexUMI software, run plain uv sync instead, which installs everything. Without uv, pip install GEAR_Neck/files/software/neck_control works too, but that install does not include the settings file config/neck.yaml: pass a copy of it to every command with --config.This installs four commands. Run them from the repository root with uv run --package gear-neck, as in the examples on this page, or directly once .venv is activated. Plain uv run would first install every project in the repository.
| Command | What it does |
|---|---|
neck_assign_id | Lists the drives on the bus and gives a drive its CAN ID |
neck_zero | Makes the pose the neck holds its home position |
neck_angles | Prints yaw, pitch and roll, with torque off |
neck_move | Turns the neck to given angles, then back home |
CAN Adapter
The computer reaches the actuators through the Jhoinrch RH-02 USB-CAN adapter from the Bill of Materials. Wire its terminal block to the neck’s CAN bus:
| Adapter terminal | Connect to |
|---|---|
| CAN_H | CAN_H of the actuators |
| CAN_L | CAN_L of the actuators |
| GND | Ground of the actuator supply |
| 5V | Not connected |
Set the adapter’s DIP switches: the 120 Ω termination on, and BOOT off. With BOOT on, the adapter starts in its bootloader (DFU mode) and does not show up as a CAN adapter.
The commands reach the adapter in one of two ways.
On Linux with can-utils: bring the adapter up as the CAN interface can_neck at 1 Mbit/s, which every command uses by default. The script needs slcand from can-utils; install it with your distribution’s package manager, then run the script:
sudo apt install can-utils     # Debian, Ubuntu
sudo dnf install can-utils     # Fedora
sudo pacman -S can-utils       # Arch
sudo GEAR_Neck/files/software/neck_control/scripts/setup_can.shThe interface does not survive unplugging the adapter or a reboot: run the script again after either.
Anywhere else (without can-utils, without root, or without Linux, such as on macOS): the commands talk to the adapter’s serial port directly, which they find by the adapter’s USB id, with neither the script nor can-utils. Each command on this page is shown both ways: first through can_neck, then, as the second choice, through slcan with --interface slcan (for neck_assign_id, after scan or assign).
In Python, open the neck with Neck(interface="slcan"). To make slcan the default for the commands and Neck() alike, so that --interface slcan can be left out, set interface: slcan under can: in the settings file.
On Linux, opening the serial port needs membership of the dialout group (uucp on Arch): run sudo usermod -aG dialout $USER once, then log out and back in.
One program at a time Only one program may talk to the drives at a time: their replies do not say who asked.
Motor Bring-Up
Do this before assembly Each actuator is given its CAN ID and checked on its own, before it is installed on the neck. Repeat the steps below for the Yaw, Roll and Pitch actuators, one at a time.
Power on only one actuator at a time (24 V). Every drive leaves the factory on the same ids, and two drives on one ID cannot be told apart.
1. Assign the CAN ID
A drive takes commands on its ID and replies on its CAN_ID. Connect the single actuator to the CAN adapter, power it on, and list the drives that answer:
uv run --package gear-neck neck_assign_id scan
# or, through slcan:
uv run --package gear-neck neck_assign_id scan --interface slcan
pinging IDs 1-252...
ID 1 CAN_ID 0 model 31011 firmware 3.3.0 torque off 23.89 V fault NONE encoders calibratedThen give it the ids of its joint, here the yaw (use --joint roll or --joint pitch for the others). The command shows the change and asks before it writes anything:
uv run --package gear-neck neck_assign_id assign --joint yaw
# or, through slcan:
uv run --package gear-neck neck_assign_id assign --joint yaw --interface slcan| Actuator | ID | CAN_ID |
|---|---|---|
| Yaw | 50 | 51 |
| Roll | 52 | 53 |
| Pitch | 54 | 55 |
| Factory default | 1 | 0 |
Power-cycle the actuator and run scan again: its line should now end in (yaw), (roll) or (pitch). Label the actuator so it goes in the right joint.
2. Check the Encoder Calibration
The actuators ship with their encoders calibrated, and scan shows it at the end of each line. encoders calibrated means register 403 reads 0x3C: both encoders are calibrated, so the home position set in Homing survives a power cycle.
If a line ends in encoders NOT calibrated, calibrate that actuator with SteadyWin’s GIM GUI software, as section 4.2 of the vendor manual describes: with its output shaft free to turn, write 51 to register 403 and wait while the shaft turns slowly back and forth, until the register reads 60. The firmware notes in files/firmware/ list the registers the software relies on.
When all three actuators have their ids and are labelled, continue with the Hardware Guide assembly.
Homing the Neck with the Homing Fixture
After assembly Once the neck is fully assembled, the Homing Fixture holds it at its zero pose while the home position of the whole neck is set and stored.
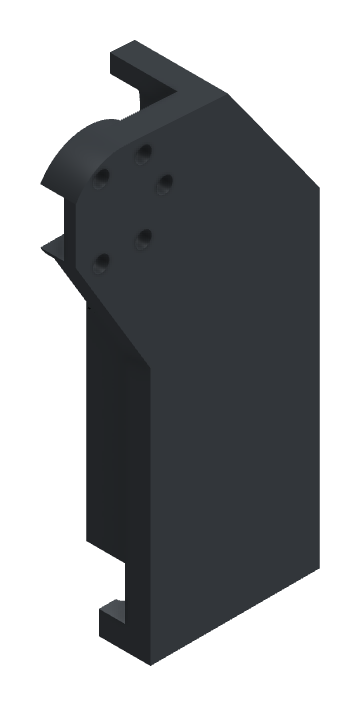
1. Print the Homing Fixture
Print the fixture in PLA, like the other custom-made parts: 3MF, STL.
2. Prepare the Neck for Homing
Power the assembled neck and check that all three drives answer: uv run --package gear-neck neck_assign_id scan lists IDs 50, 52 and 54, ending in (yaw), (roll) and (pitch). Their torque must be off so the neck moves freely. It is, unless a program is driving the neck: stop it. uv run --package gear-neck neck_angles also switches off torque a previous program left on.
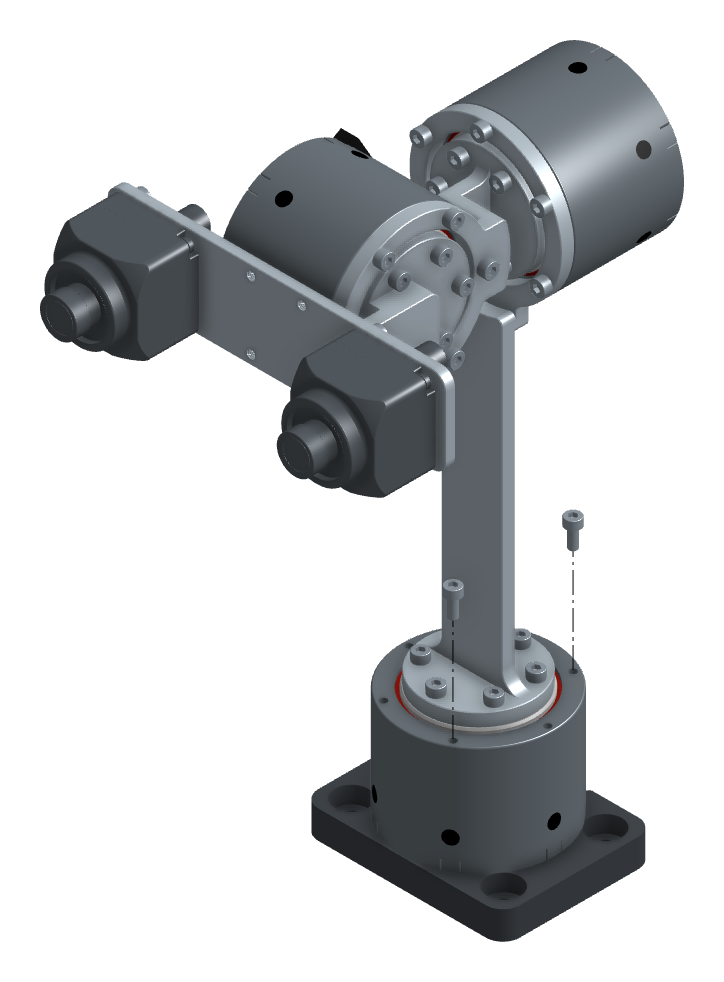
If the Neck Cover is on, take it off: the fixture sits where the cover goes. Then fasten two M2.5×6 screws into the top of the Yaw Actuator, as shown.
3. Seat the Fixture on the Neck
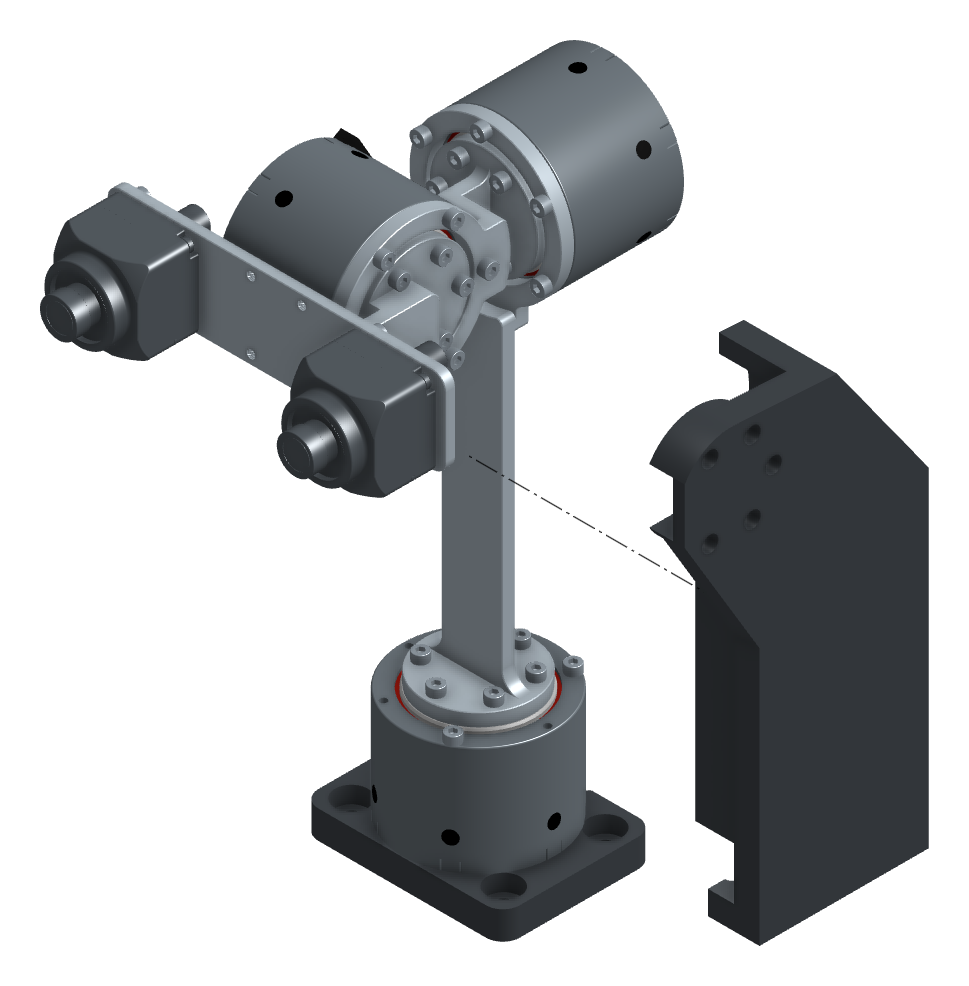
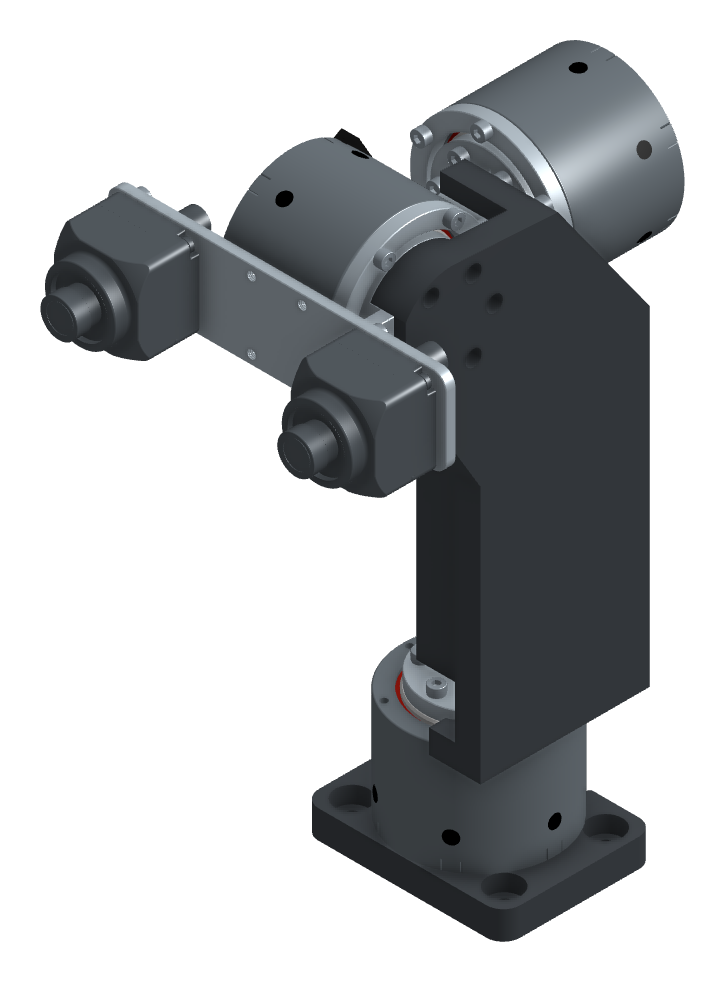
Slide the fixture onto the neck until it is fully seated. This holds all three joints at zero.
4. Set and Store the Home Position
With the fixture seated, run:
uv run --package gear-neck neck_zero
# or, through slcan:
uv run --package gear-neck neck_zero --interface slcan
Press Enter when the neck is in the fixture. The command reads each joint’s position and shows how far its zero would move, then asks before writing anything. On y, the pose the neck holds becomes the home position of Yaw (50), Roll (52) and Pitch (54). Each drive stores it: with calibrated encoders it survives a power cycle. --joints pitch zeroes only the joints named.
5. Remove the Fixture and Verify
Power-cycle the neck and run uv run --package gear-neck neck_zero again with the fixture seated, answering n: every joint should read close to 0. Then remove the fixture and its two M2.5×6 screws (one of them is where the cover goes), and send the neck home under power:
uv run --package gear-neck neck_move --yaw 0 --pitch 0 --roll 0
# or, through slcan:
uv run --package gear-neck neck_move --yaw 0 --pitch 0 --roll 0 --interface slcan
Confirm the camera faces straight ahead, then press Enter to switch torque off.
Usage
1. Joint Directions
All angles are in degrees, from the head’s own point of view. The neck is an orthogonal gimbal (yaw, then roll, then pitch from the torso), so its joint angles are also the camera’s yaw, pitch and roll.
| Joint | Positive direction | Limits |
|---|---|---|
| Yaw | Turns the head right | −90° to +90° |
| Pitch | Nods the head down | −60° (up) to +80° (down) |
| Roll | Tilts the head right (right ear down) | −40° to +40° |
Commands outside the limits are clamped to them.
2. Read the Angles
uv run --package gear-neck neck_angles
# or, through slcan:
uv run --package gear-neck neck_angles --interface slcan
yaw ID 50 / CAN_ID 51 23.9 V mode POSITION
roll ID 52 / CAN_ID 53 23.7 V mode POSITION
pitch ID 54 / CAN_ID 55 23.8 V mode POSITION
Turn the head by hand to check each joint's direction; Ctrl-C to stop.
yaw +0.1 pitch +2.0 roll -0.4 degTorque stays off, so the neck can be turned by hand: each angle should grow in the positive direction of the table above.
3. Move the Neck
uv run --package gear-neck neck_move --yaw 20 --pitch 10
# or, through slcan:
uv run --package gear-neck neck_move --yaw 20 --pitch 10 --interface slcan
This switches torque on, turns the neck to the angles at up to 60°/s and prints where it got to. A joint left out holds where it is. Press Enter to send the neck home and switch torque off.
4. Python Interface
from gear_neck import Neck

with Neck() as neck:                         # finds the drives; torque stays off
    print(neck.angles())                     # yaw, pitch and roll, in degrees
    neck.enable()                            # torque on, holding where it is
    neck.move_to(yaw=20, pitch=10, roll=0)   # blocks until the neck is there
    neck.set_target(yaw=-20)                 # returns at once, for streaming targets
# leaving the block switches torque off
A background thread runs the control loop at 200 Hz: it ramps each joint toward its target and sends it to the drive, whose reply gives the measured angle. Neck(interface="slcan") uses the adapter directly, like the commands’ --interface slcan.
Torque off The drives have no watchdog: with torque on, they hold their last command. The software switches torque off when it closes the neck, when the program exits, and as soon as a drive reports a fault or stops answering. A program killed outright (for example with kill -9) leaves the neck holding its pose: run uv run --package gear-neck neck_angles, which switches torque off, or power-cycle the neck.
5. Settings and Gains
Everything specific to one neck is in the settings file config/neck.yaml: each joint’s ids, limits and gains, whether its drive is mounted reversed (the yaw drive is), the top speed and the CAN interface. The file explains each setting. Every command and Neck() read it; a setting that is missing, misspelled or out of range stops them with an error that names it.
joints:
  - {name: yaw, id: 50, can_id: 51, reversed: true, kp: 2, kd: 0.05, min_deg: -90, max_deg: 90}
  ...
can:
  interface: socketcan
To keep settings for several necks, copy the file, edit the copy, and pass it to every command with --config, or to Neck(config="my_neck.yaml") in Python.
Each joint follows its target with the drive’s own PD loop: a stiffness kp (Nm/rad) and a damping kd (Nm·s/rad). All three joints use kp: 2 and kd: 0.05. If a joint lags or stops short of a target, raise kp; if it overshoots or buzzes, add kd.